Archives

How to use Background Avatar plugin?

If the Profile Picture field is not required on the signup form, the majority of users on your website will not upload a profile picture, resulting in profile pictures that are similar across the site (like the picture below)

1

The Background Avatar plugin can help you solve this problem. After you’ve installed the plugin on your site, members who don’t upload a profile picture when they sign up will get an avatar with their name initials and a random background color, and the default profile picture will be replaced with the auto-generated one.

2

People page – square profile picture


To change the profile picture’s shape from Square to Circle, do the following:

1/ Access to Admin Dashboard => Plugin Manager => Avatars

3

2/ Tick on Circle then click the Save Settings button.

4

3/ On the front end, the shape of the profile picture will be changed to a circle.

5

People page – circle profile picture

How to use Anti AdBlock plugin?

Anti Ad Block add-on allows you to detect users with ad-blocking software enabled and restricts their access to your website until they disable adblocking.

This tutorial will guide you on how to use the Anti Adblock plugin.

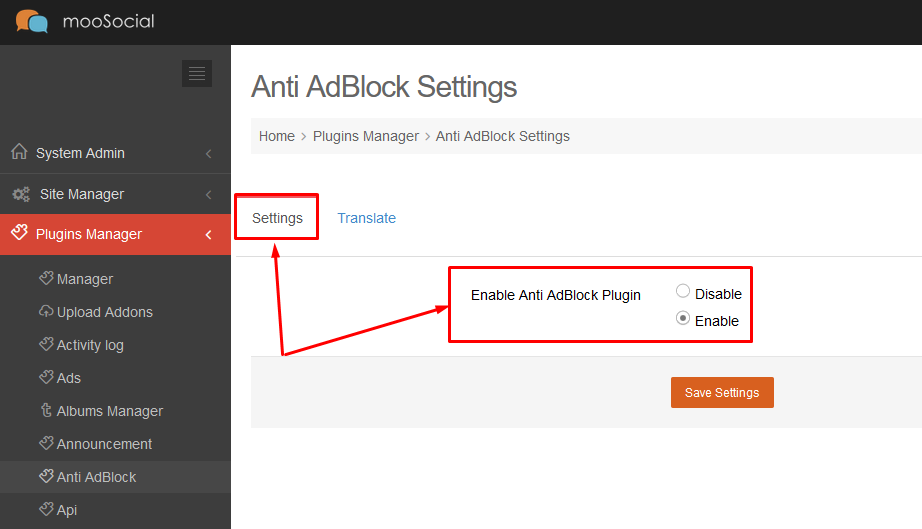
Access to Admin Dashboard => Plugin Manager => Anti Adblock

At the Settings tab, you can enable or disable the plugin.

ad_01

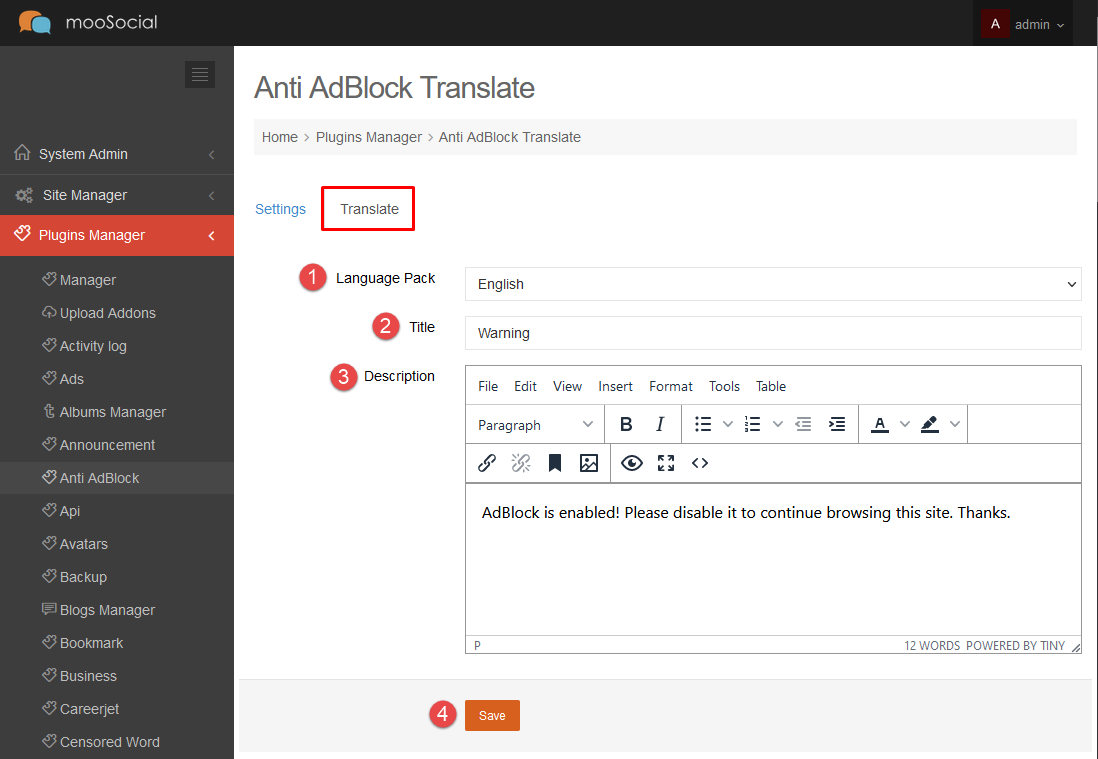
At the Translate tab, you can edit and translate warning messages.

ad_02

1. Language Pack: choose the language to edit the description for the warning message.

2. Title: enter the title for the warning message.

3. Description: enter the description for the warning message.

4. Save button.

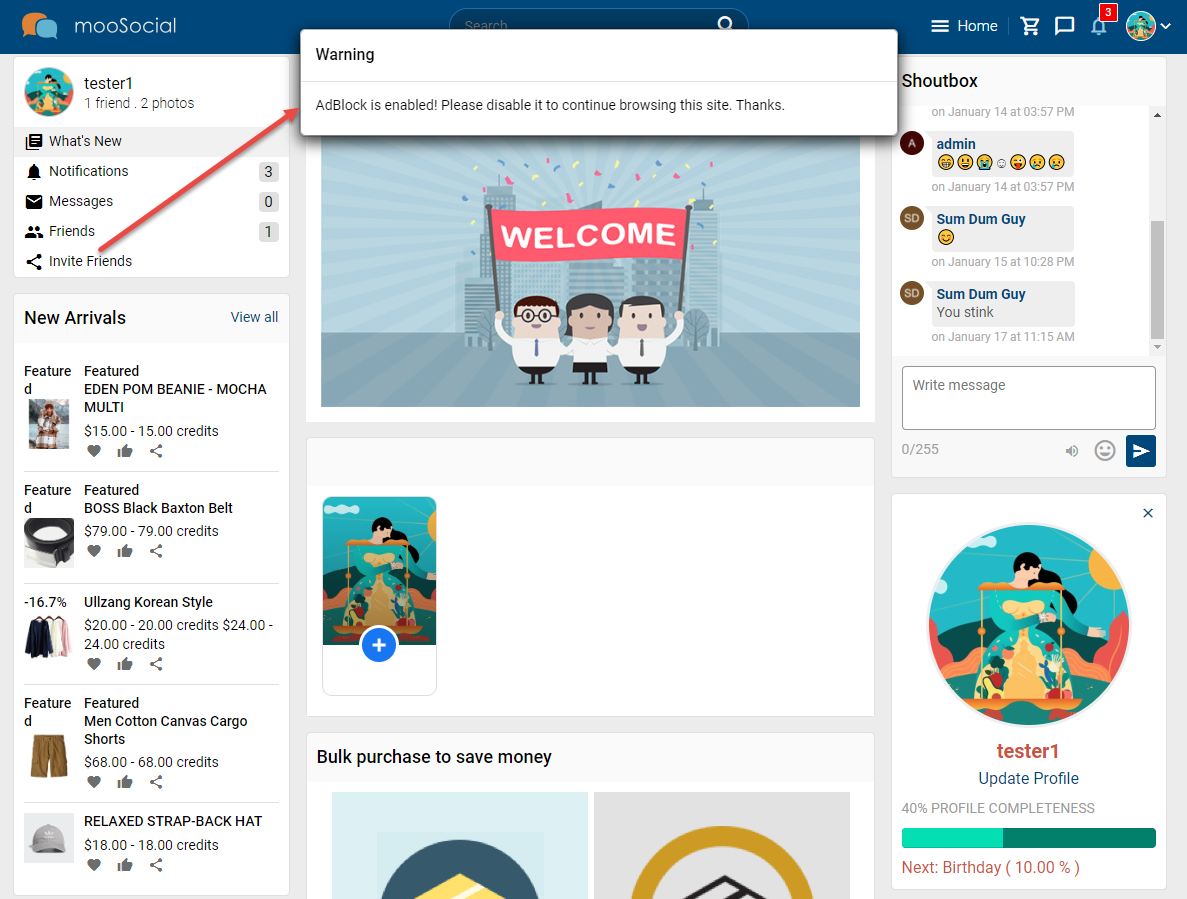
If members access a website with ad-blocking software, they will see a warning message as below and can not do anything until turn off ad-block.

ad_03

How to add new status background?

The Colored Background Status plugin includes a feature that allows Site Admin to create new background statuses. This guide will show you how to make a new background status.

- Access to Admin Dashboard => Plugin Manager => Status Background => General tab.

- Click the Add New button => show pop-up.

1

– There are four different types of background statuses:

  • Type 1: Background Image

2

          [1] Choose Text Color: set the text color by entering the color hex code.

          [2] Image: click here to upload image

          [3] Enable: tick here to enable this type.

=> Click the Save button. The background image has been saved successfully.

3

After that, the new status background will be visible on the front end.

4

  • Type 2: Background Color

5

           [1] Choose Text Color: set the text color by entering the color hex code.

           [2] Choose Color: set the color by entering the color hex code.

           [3] Enable: tick here to enable this type.

=> Click the Save button. The background color has been saved successfully.

6

The new status background will be visible on the front end.

7

  • Type 3: Background Gradient

8

           [1] Choose Text Color: set the text color by entering the color hex code.

           [2] Choose a colorful gradient background.

           [3] Enable: tick here to enable this type.

=> Click the Save button. The background color has been saved successfully.

9

(Front-end) The new status background will be visible.

10

  • Type 4: CSS

11

           [1] Choose Text Color: set the text color by entering the color hex code.

           [2] CSS Code: input code here.

           [3] Enable: tick here to enable this type.

=> Click the Save button. The background color has been saved successfully.

12

The new status background will be displayed on the front-end.

13

Hopefully, this guide was helpful for you!

How to share new post with Status Background?

Using the Colored Background Status plugin, you can add a background to text posts from your home feed or a group/event to make them more attractive and catchy. Follow this guide to learn how to make posts with backgrounds.

1/ Go to Home, Group detail or Event detail pages. 

2/ Click the Background Color option below your profile picture, then select a colored square to choose a background for your text.

1

3/ Type your message or status update

2

4/ Click the Share button to post it.

3

How to create a new category list?

This tutorial will demonstrate how the Site Admin can create a new category for the Feedist plugin.

Step 1: Access to Admin Dashboard => Plugin Manager => Feedlist => Categories tab.

1


Step 2: Click on the Action button => select Add New option on the drop-down list.

2


Step 3: At the Create Categories page:

1) Click on the URL link https://getemoji.com/ to be redirected to the Get Emoji page.

3


2) Copy the icon, then paste the value into the Icon field.

4


3) Enter the category name into the Name field.

5


=> Click the Save button. The new category has been added.

6


(Front-end)

This category will be visible to site members when they create a new feedlist.

7