Please follow the instructions below to install the Solution.
Cookie configuration
Cookie configuration for WordPress site: Add the following code to your wp-config.php file, which is located in the root directory of your WordPress installation.
Please put these codes above the default define in the file.
/* Multisite */
define( 'WP_ALLOW_MULTISITE', true );
define('COOKIE_DOMAIN', $_SERVER['HTTP_HOST'] );
/* mooSocial Integration */
define('COOKIEHASH', md5('MOO@SOCIAL#LOFT^2023!$'));
define('COOKIE_DOMAIN', 'yourdomain.com');
define('COOKIEPATH', 'yourdomain.com/');
define('SITECOOKIEPATH', '/');
define('ADMIN_COOKIE_PATH', '/');
define('TEST_COOKIE', 'wpmoo_test_cookie' );
define('AUTH_COOKIE', 'wpmoo_' . COOKIEHASH );
define('USER_COOKIE', 'wpmoo_user_' . COOKIEHASH );
define('PASS_COOKIE', 'wpmoo_pass_' . COOKIEHASH );
define('SECURE_AUTH_COOKIE', 'wpmoo_sec_' . COOKIEHASH );
define('COOKIE_WPMOO_KEY', 'wpmoo_key_' . COOKIEHASH);
define('LOGGED_IN_COOKIE', 'wpmoo_logged_in_' . COOKIEHASH );
define('LOGGED_ADMIN_COOKIE', 'wpmoo_logged_admin_' . COOKIEHASH);
Importance:
define(‘COOKIEHASH’, md5(‘MOO@SOCIAL#LOFT^2023!$’));==> replace ‘MOO@SOCIAL#LOFT^2023!$’ with a 22 character string of numbers, letters, and symbols
define(‘COOKIE_DOMAIN’, ‘yourdomain.com’); ==> Replace ‘yourdomain.com’ with your actual domain name.
define(‘COOKIEPATH’, ‘yourdomain.com/’); ==> Replace ‘yourdomain.com’ with your actual domain name.
Cookie configuration for mooSocial site: Download the moosocial platform (moosocial 3.20.zip) here and Edit file ‘app/Plugin/WordpressIntegration/Config/constants.php’
define( 'WP_COOKIEHASH', md5('MOO@SOCIAL#LOFT^2023!$'));
define( 'WP_LOGGED_IN', 'wpmoo_logged_in_'.WP_COOKIEHASH );
define( 'WP_USER_KEY', 'wpmoo_key_'.WP_COOKIEHASH );
Importance:
find “define( ‘WP_COOKIEHASH’, md5(‘MOO@SOCIAL#LOFT^2023!$’));”,
replace ‘MOO@SOCIAL#LOFT^2023!$’ with a similar code in WordPress Site
Install the mooWP plugin.
- Download the mooWP plugin here
- Go to Admincp of your existing wordpress site -> Plugins -> Add new
- Click on “Upload plugin” button to add the ZIP file (mooWP.zip) downloaded from moosocial.com
- Click Install Now to install
- When installation is finished, Activate the plugin.
Install mooTheme template (don’t install if you want to use your existing theme)
- Download the mootheme template here
- Go to Admincp of your existing wordpress site -> Appearance > Themes -> select “Add New”
- Click on “Upload Theme” button to add the ZIP file (mootheme.zip) downloaded from moosocial.com
- Click Install Now to install
- When installation is finished, Activate the theme.
Install mooSocial platform
It’s recommended to purchase a separate hosting package to install mooSocial. If your existing hosting is strong enough, you can install a community site at the same place with your existing Worpdress installation.
Please do this step if you use a self-hosted package. If you use our cloud package. Please ignore this section.
Upload the source code of mooSocial that you have updated at the “Cookie configuration step” above. Follow the below step to install mooSocial
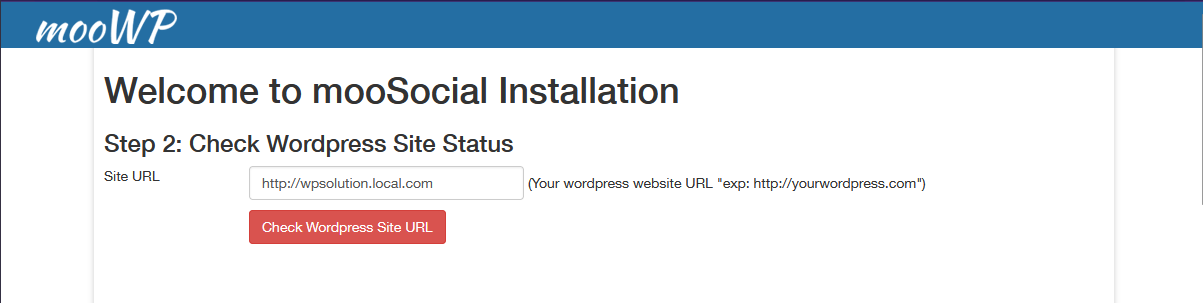
Step 1: Run the mooSocial installation wizard by accessing the URL in the web browser. This should be the URL where you uploaded the mooSocial files (Ex.http://example.com; http://example.com/moosocial)

Step 2: Enter URL of your existing wordpress site to start the integration
Step 3: If the URL of your existing wordpress site is valid, the security key field will appear.
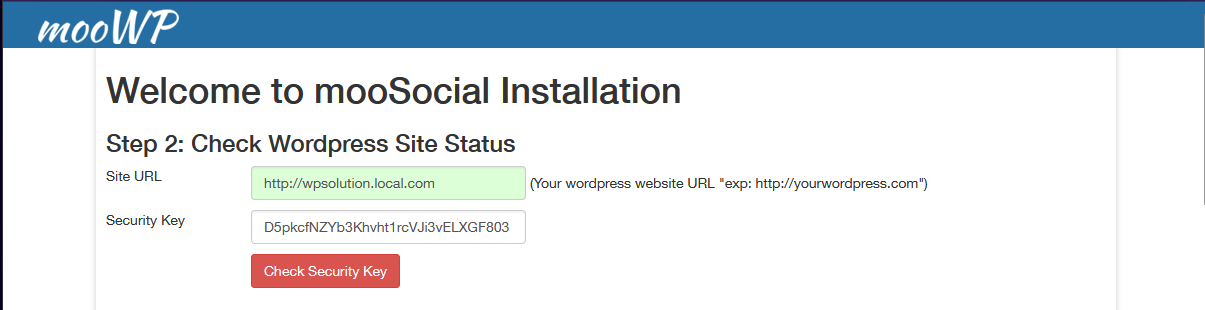
Open the mooWP plugin to get the key and enter the key into this step to continue
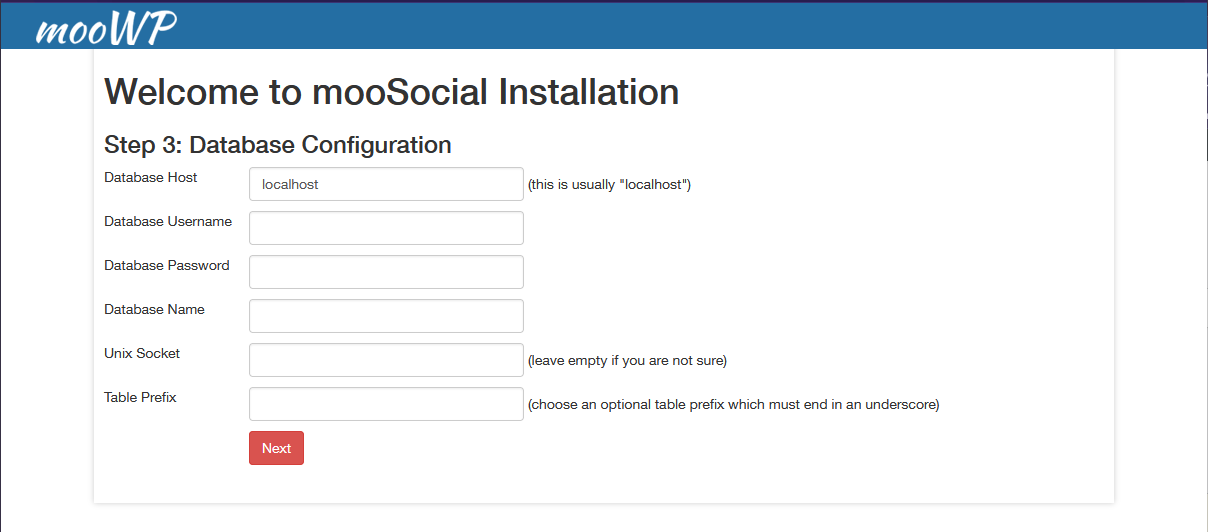
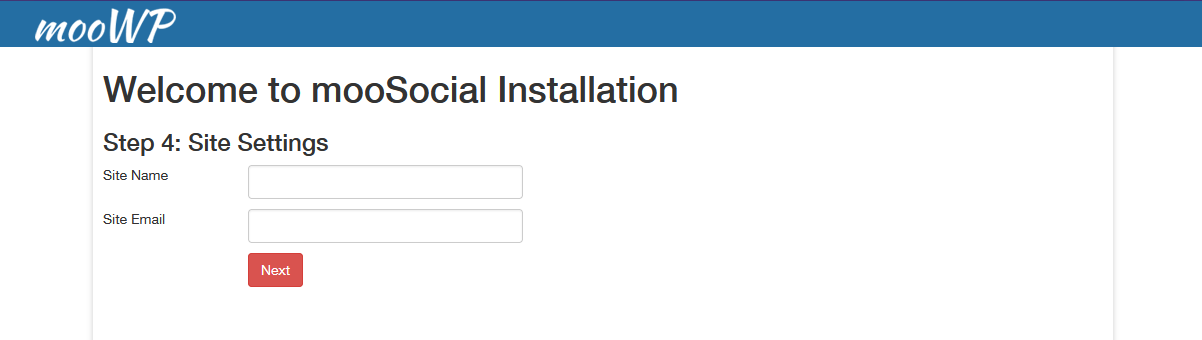
Step 4: Enter your database information and click Next.
Step 5: Enter your site name (Ex. mooSocial Demo). Site email is the email address your site will use to send out email notifications. Once chosen, default time zone will be preselected for all new signups.
Step 6: Enter information for Super Admin account of the community site and press Next.
This Super Admin account must be consistent with your WordPress site’s Super Admin account.
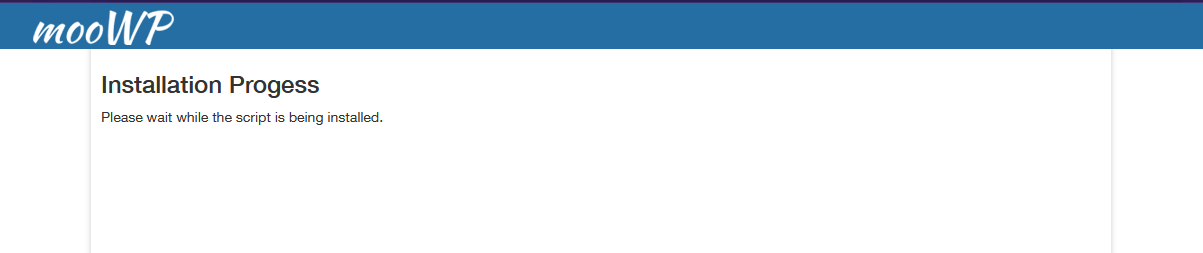
Step 7: Done
Configuration
After installing, please follow the below steps to configure.
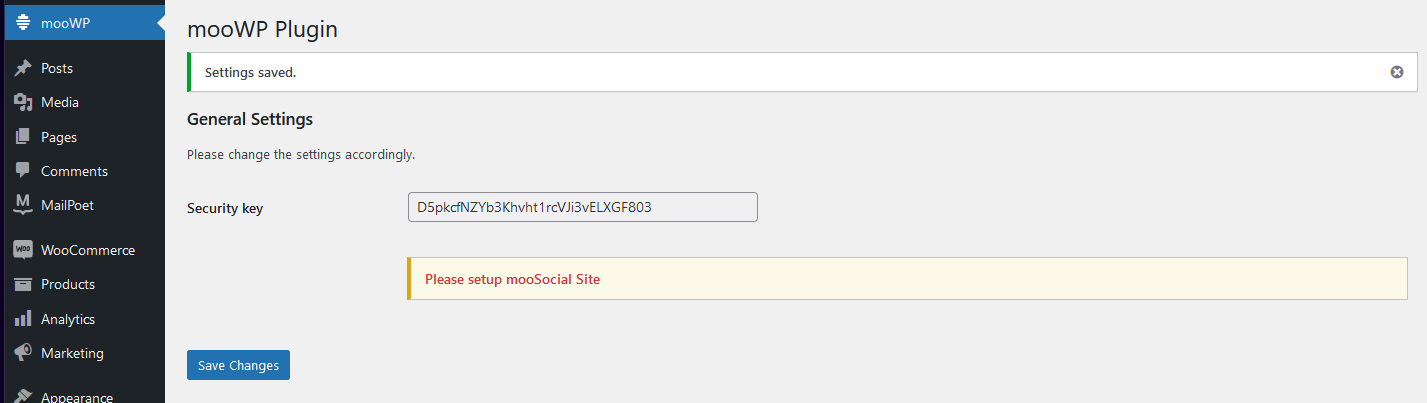
General setting for mooWP plugin
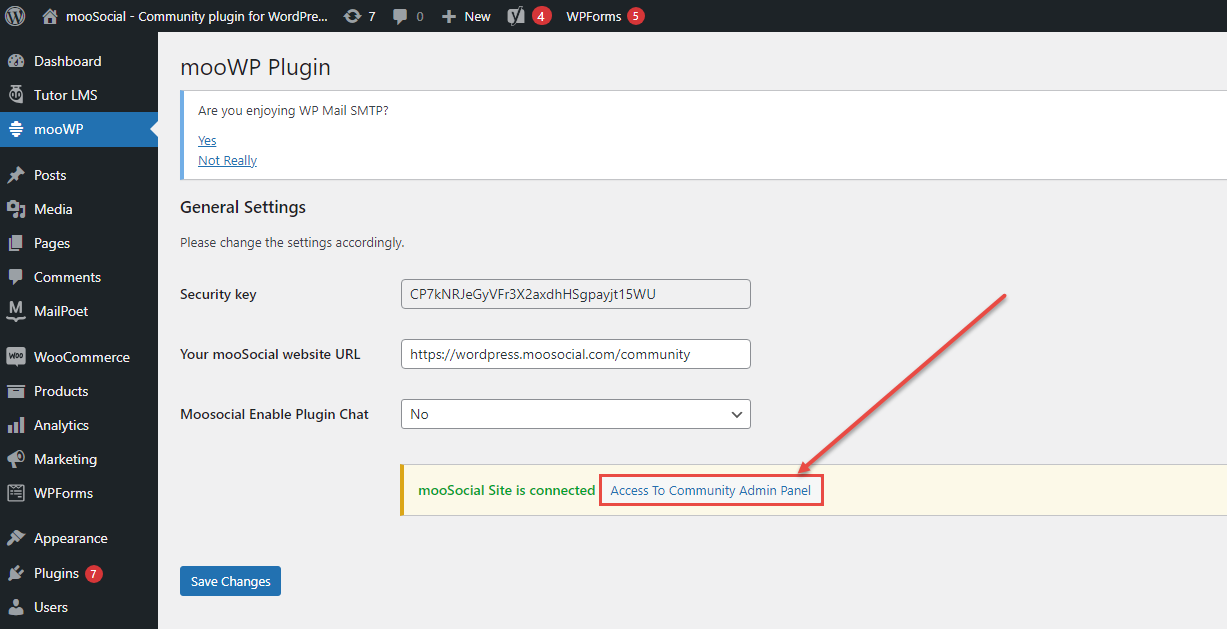
Go to Admincp of your existing wordpress site -> mooWP
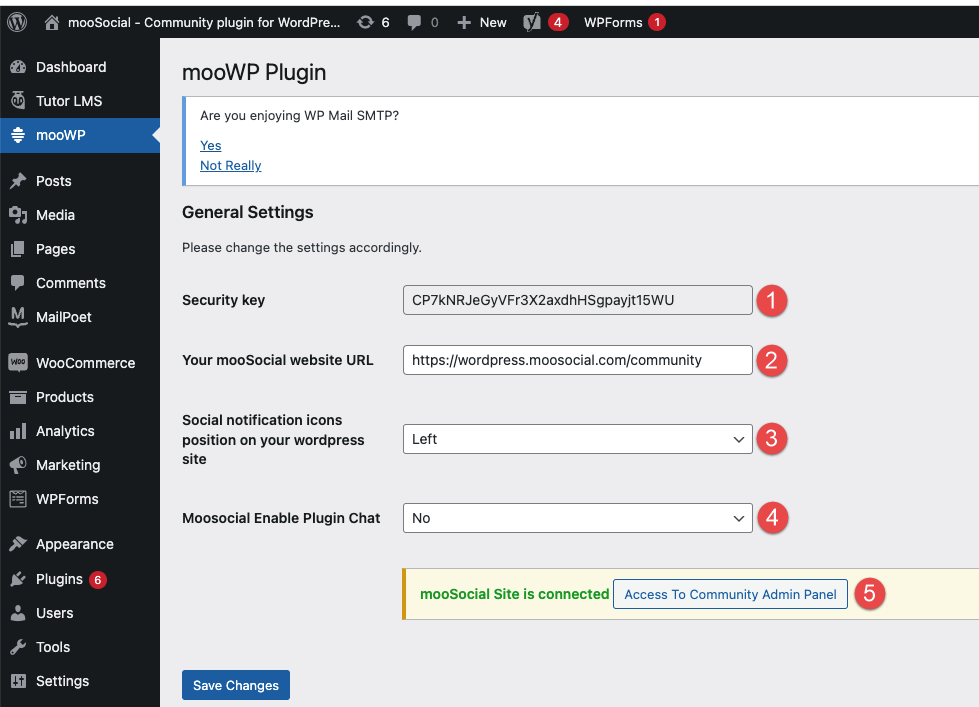
(1) We will use this key at step 3 of mooSocial installation process above. If you change this key, please update it also at mooSocial site -> admin panel -> WordPress integration.
(2) The URL of the mooSocial site that link with your wordpress site. You will have this url after finish the steps to install moosocial platform above
(3) This option only appear if you’re not using the mooTheme. It allow you to configure the position of the notifications icon at your wordress site
![]()
(4) Select Yes if the chat plugin is enable at community site.
(5) To indicate that the moosocial site is enabled or not. Click on this link to access the admin dashboard of the community site. It does not work if the moosocial is not installed yet.
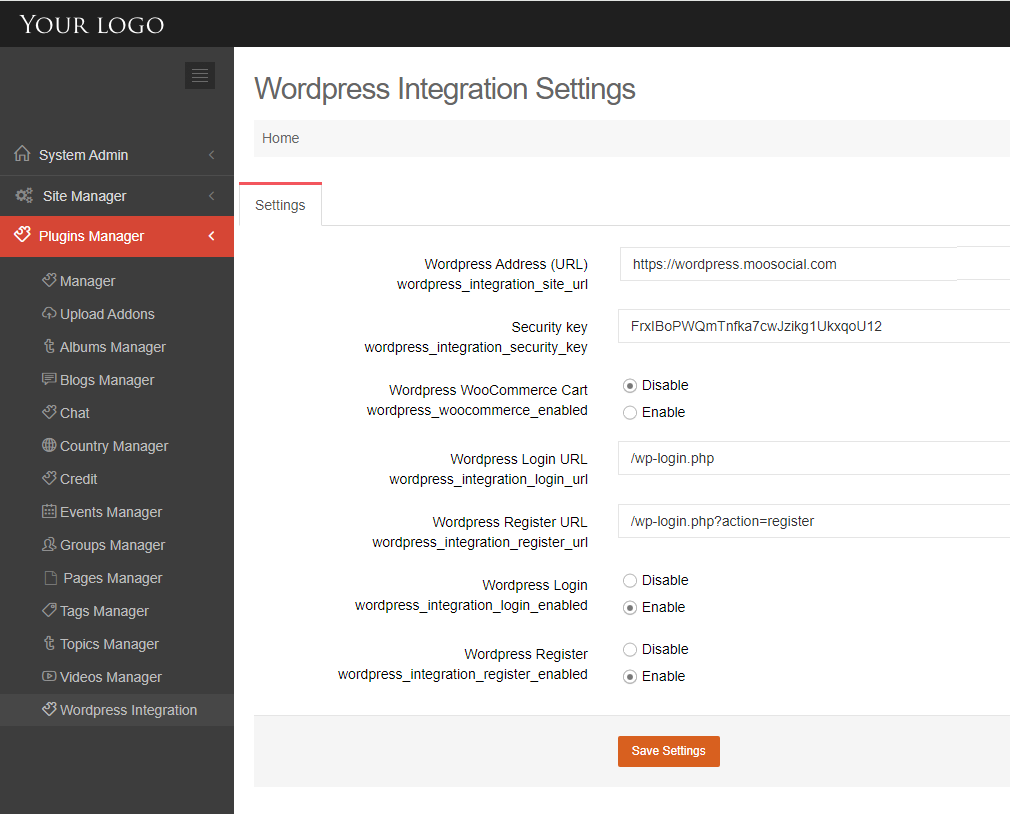
General settings for the “Wordpress integration” module at the community site.
Go to Admincp of your existing wordpress site -> mooWP -> click on “Access To Community Admin Panel”, it will take you to admin panel of the community site

At the admin panel of the community site, please navigate to the Plugin manager -> WordPress integration module
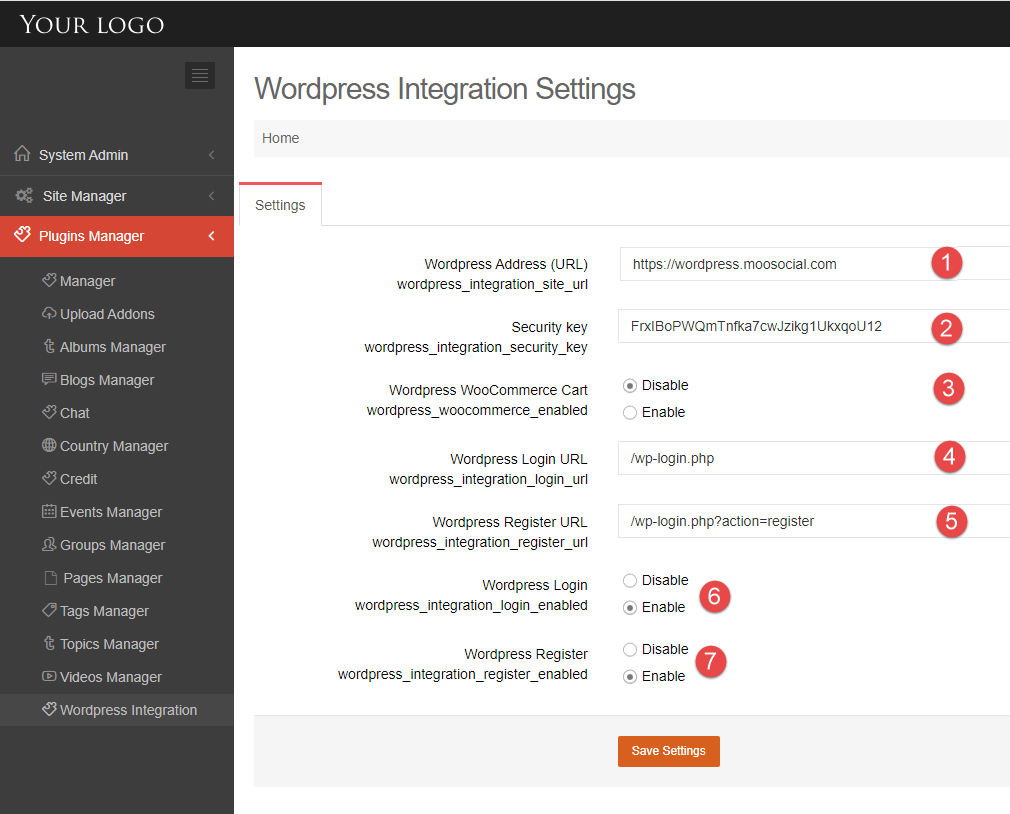
(1) Enter your existing Worpdress site URL
(2) Security key: enter the key the you generate at the mooWP plugin at your WordPress website
(3) Enable/disable the cart icon at the community site. If your wordpress site installed the WooCommerce plugin, you should enable this option
(4) Login URL of the “Login” in the community site. You need to configure this correctly because the login/sign up is already disabled at the community site. The login/sign up will be through the Wordpress site.
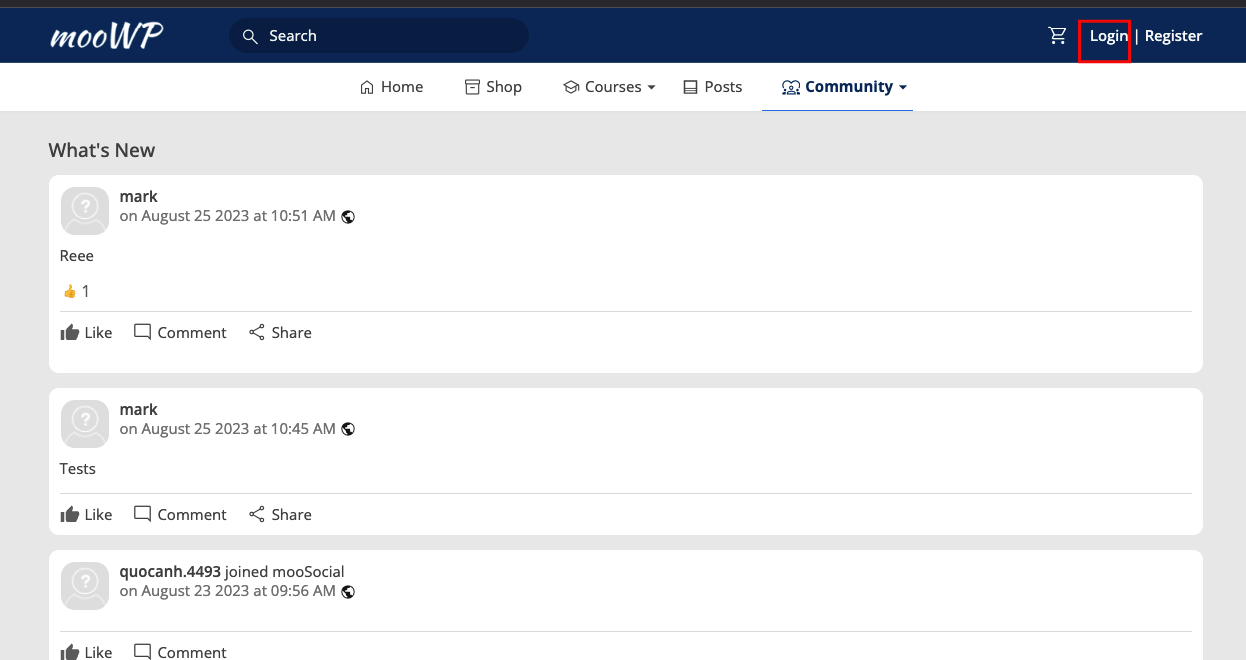
(5) Same as #4, you also need to configure the registration url for the “Register” link at the community site. It should be the registration link of your WordPress site.
(6) If you don’t want to show the login link at the community site, you can disable it using this setting.
(7) If you don’t want to show the register link at the community site, you can disable it using this setting.
Navigation bar setting for mooWP plugin
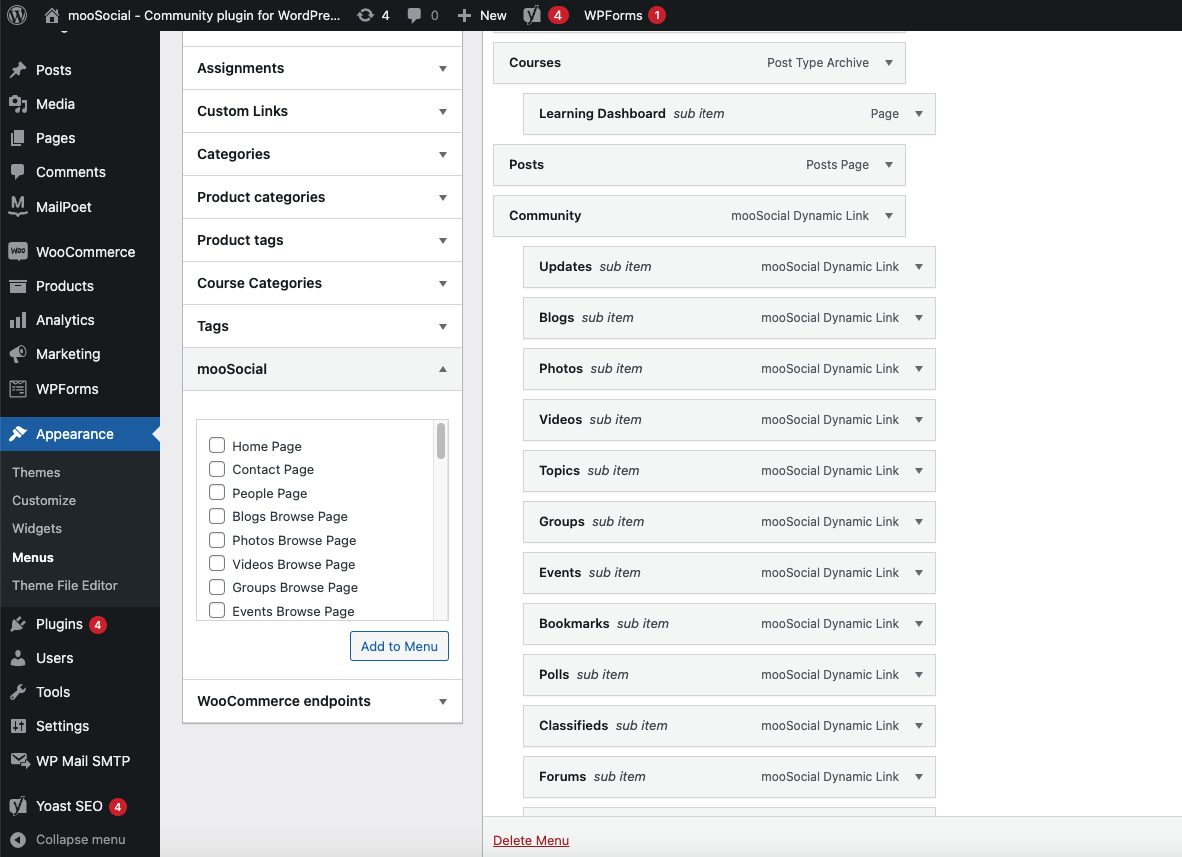
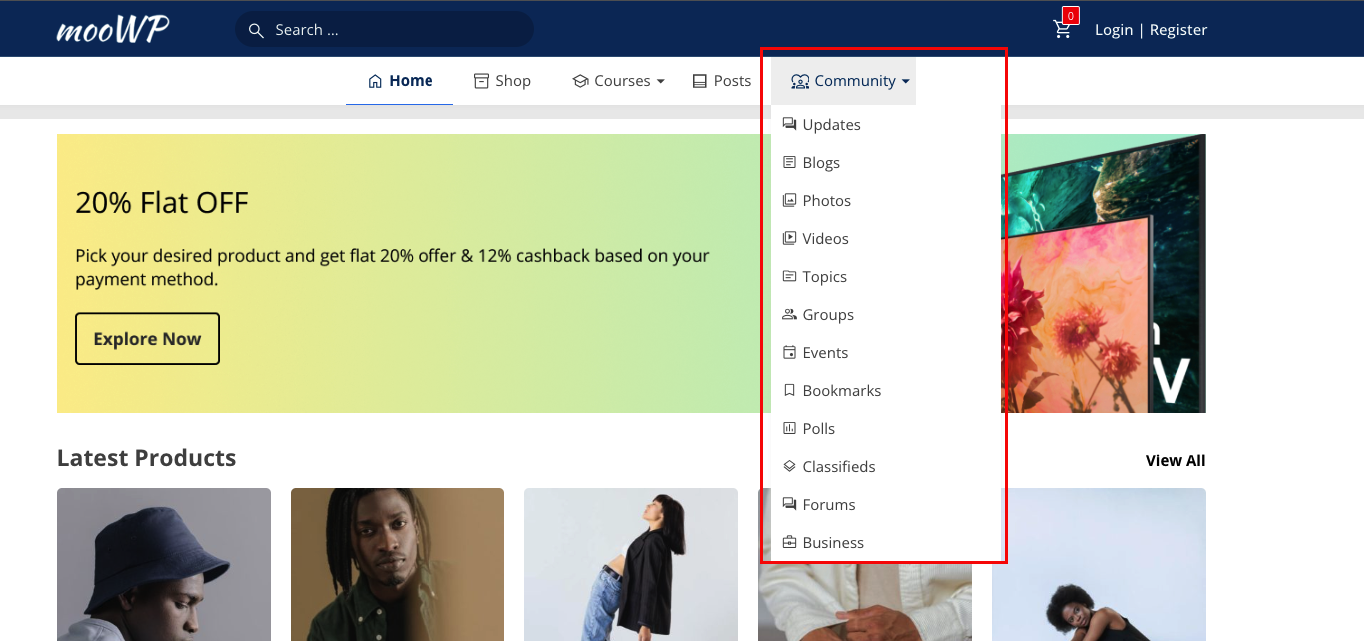
After installing the mooWP, you can see the mooSocial menu item at the menu section in your WordPress site’s dashboard. All of the pages from the community site will automatically be imported to allow you to insert into the main navigation bar of wordpress site.
You can create a menu named “community” then insert all of the main pages of the community side under it like what we did at the demo site here. See below screenshot
Navigation bar setting for Community site
Now, it’s time to configure the navigation bar for the community site to make the navigation the same at both platform and the integration much more seamlessly with end users
Go to Admincp of your existing wordpress site -> mooWP -> click on “Access To Community Admin Panel”, it will take you to admin panel of the community site
At the admin panel of the community site, please navigate to the Plugin manager -> WordPress integration module
Enter your existing WordPress site URL into “WordPress address URL” if you have not entered it yet and click on “Save changes”
Navigate to the “System admin” -> Menu (see below screenshot), you will see all of the menus from the WordPress site have been imported to allow you to insert into the navigation bar of the community site.
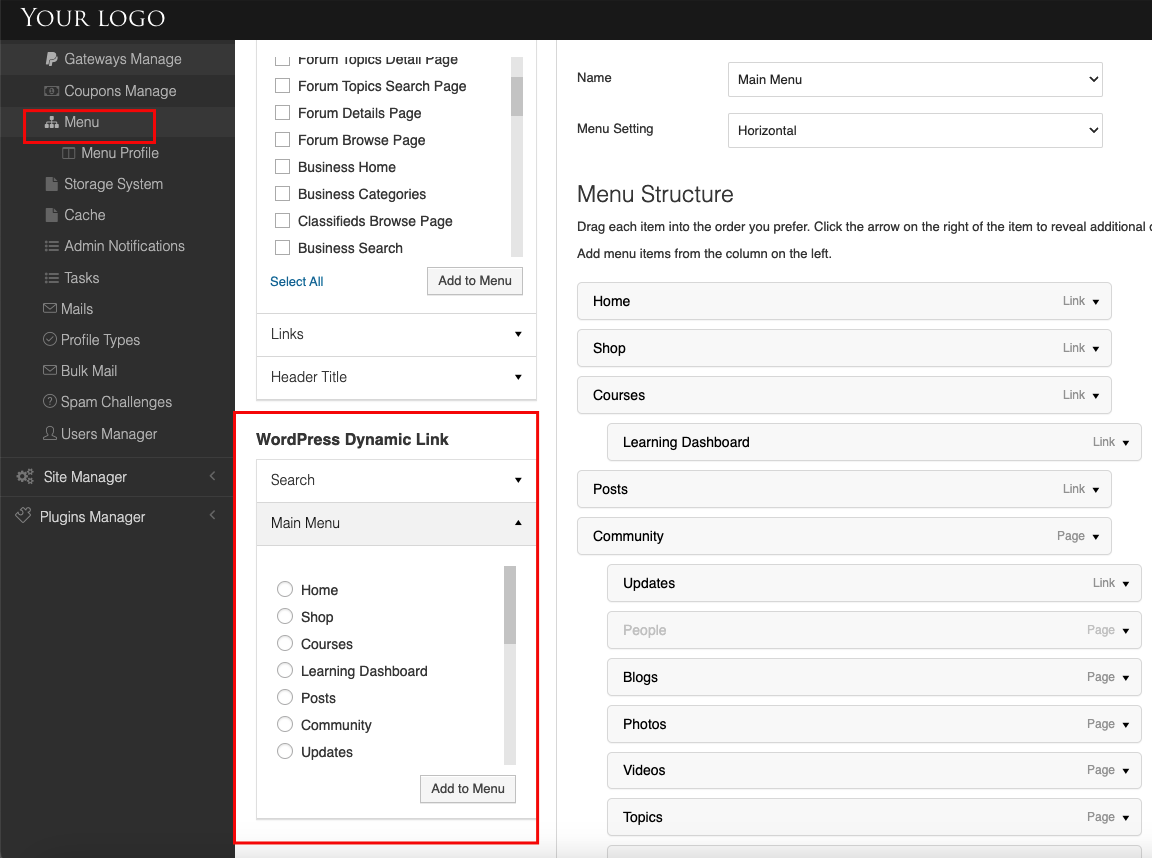
Insert the desired menu into the main navigation bar of the community to make the navigation the same at both platforms and save the changes.
What should I do next if I already have an established WordPress website and a theme?
If you already have an established WordPress website and want to change the look and feel of a community site following the look and feel of the existing site, Please contact us here. We will help you modify the look and feel of the community site the make it match with your existing Wordpress site.