Archives

How to create new brand?

Site Admin can add new brands for the Classified plugin, follow the steps below for more details.

(Back-end)
Access Admin Dashboard => Plugins Manager => Classifieds => Brands tab

Click the Add New Brand button => Show the popup.

1


Enter the brand name and then click the Save button. Now the new brand has been added successfully.

2


And can change brand name with many languages by editing brand:

Snag_2acb43da


(Front-end)

When a member enters a value in the Brand field on the Post New Listing page, the system will automatically suggest for Brand.

3


How to create and manage Classified categories?

This guide will share with you how to create and manage Classified categories.

Access to Admin Dashboard => Plugins Manager => Classifieds => Categories tab

1


#1: Create new category

Click the Add New Category button => show pop-up.

2


Fill in the blank fields:

      Enter the category name.

       - Choose the parent category.

=> Click the Save button. The category has been successfully added.

3


#2: Import categoriesThe Classified plugin supports importing categories from core plugins (Blog/Video/Photo/Topic/Group/Event)

To import categories: click the Import categories button => show pop-up.

4


Select plugin => Click on Copy button. Categories have been imported successfully.

5


#3: Save order: Site admin can change the order of the classifieds categories by entering the quantity and then clicking the Save order button to save the category order.

6


#4: Edit Category

Click the down arrow => select Edit Category option on the drop-down list => show pop-up.

7


Edit category (name, , parent category) => click the Save button.

8


Your changes have been changed successfully.


#5: Manage Fields: The Site Admin can associate dynamic fields with each category. 

Click the down arrow => select Manage Fields option on the drop-down list => Go to Manage Category Fields page.

9


         5.1. Add new category field:  Click on Add New Field button => show pop-up.

10


Fill in these fields:

         [1] Field Name: enter text.

         [2] Category: select Property Category

         [3] Field Type: select field type

         [4] Description: enter the content.

         [5] Required checkbox: tick here to make this category field is a mandatory field.

         [6] Searchable checkbox: tick here to allow members to use the search and filter functions with this category field.

         [7] Active checkbox: tick here to enable the field.

         [8] Order: enter number to arrange the field position on list.

=> Click the Save button. The Fields have been saved successfully.

11


          5.2. Edit category: same as #4 scroll up for more information.


#6: Add New Field: same as #5.1 scroll up for more information.

How to create the popup?

The new Popups plugin can display multiple popups. It’s perfect solution to show important messages such as EU Cookie notice, increase your social followers, add call to actions, introduce a new feature of your site, or to display any other important message in a simple popup.


This tutorial will show to you how to do that.

Access to Admin Dashboard => Plugin Manager => Popup

Click the Create New Popup button.

Snag_29961cd8


Input information for the fields.

001_Popup


  1. Popup Title
  2. Appear at: Select the page to show popup.
  3. Popup Content: Input the content that will be shown on the popup.
  4. Toggle images Uploader: show or hide the Upload image button. And admin can upload images to the popup content.
  5. Appear one-time only: Tick on it if you want the popup to appear only one time.
  6. Show option for member to select to hide it: Site member can hide popup (not apply for the one-time popup) if this setting is checked.
  7. Enable: will show the popup at the selected page when enabled.
  8. User roles can view: Select the user roles so that members belong to this role can see popup.

Click the Save button.

(Front-end) The popup will be shown at the selected page:

002_Popup

How to use Profile Verify Settings?

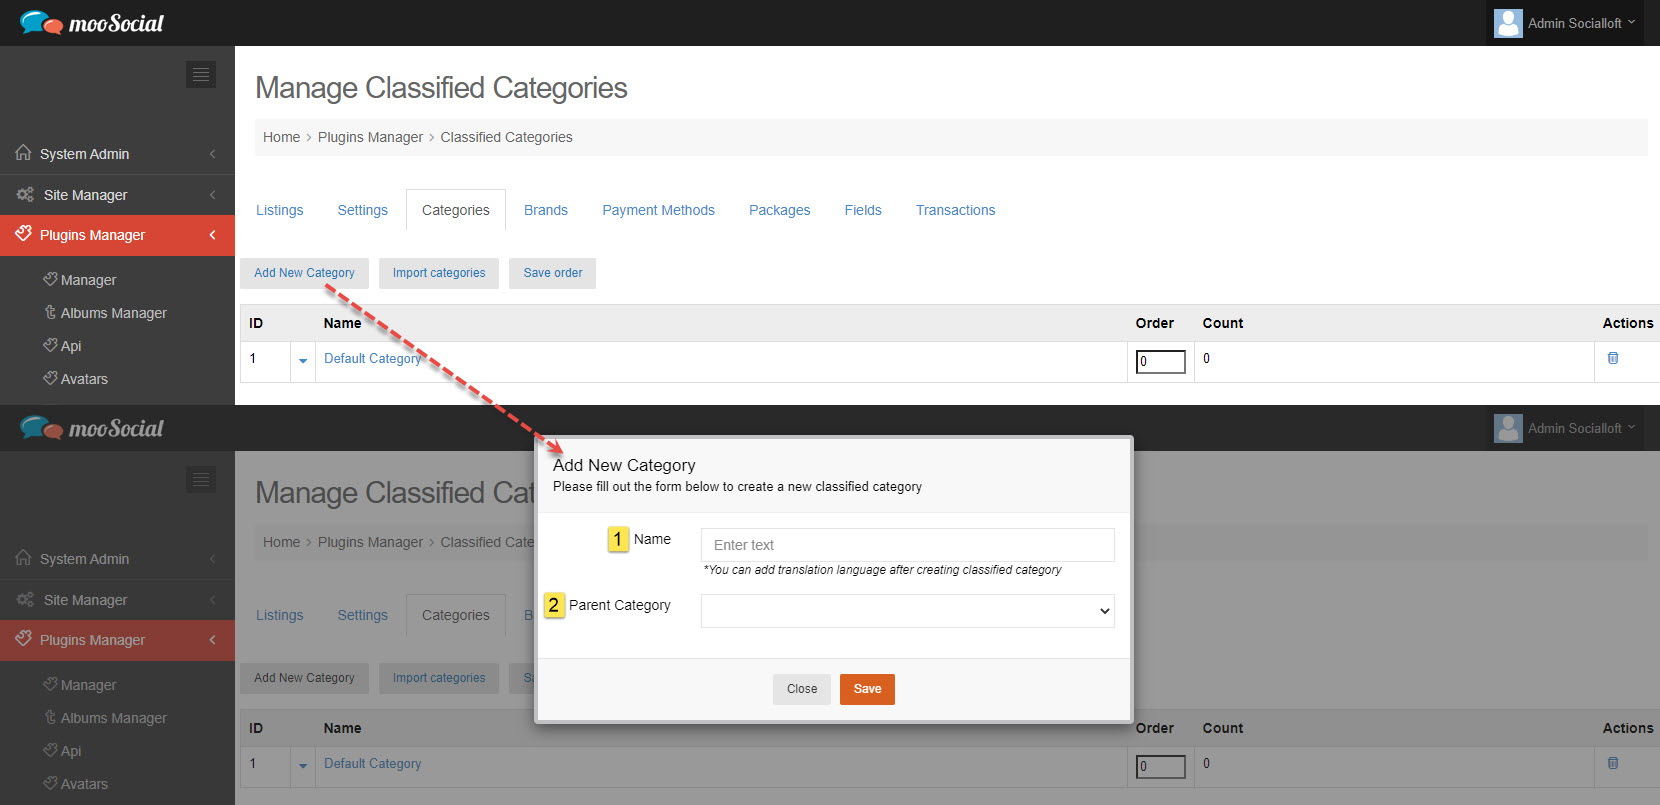
The article will guide admin how to change settings for Profile Verify plugin.

Access to Admin Dashboard => Plugin Manager => Setting tab.
010_ProfileVerify


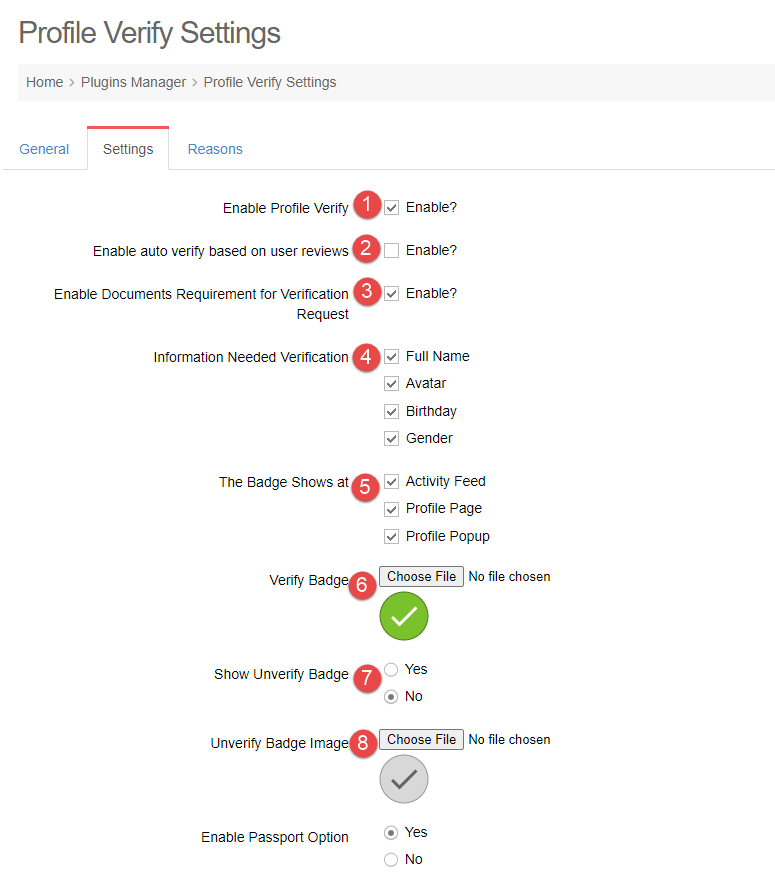
1. Enable Profile Verify: enable or disable plugin.

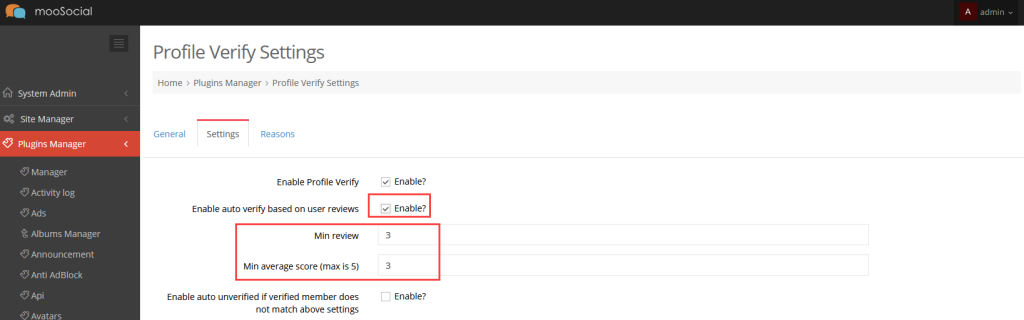
2. Enable auto verify based on user reviews: After installing the User review plug-in on site, this setting will be shown.

After enabling the setting, will display 2 fields to set up them.

Snag_26037d4a


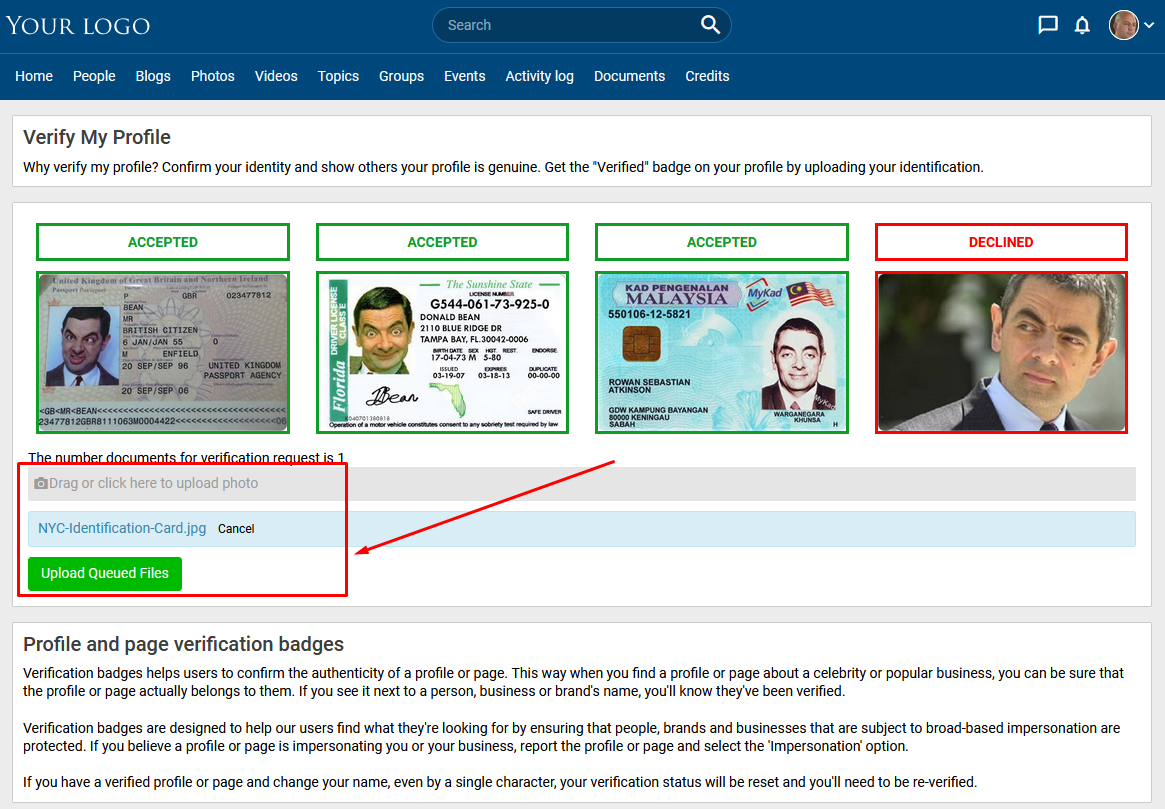
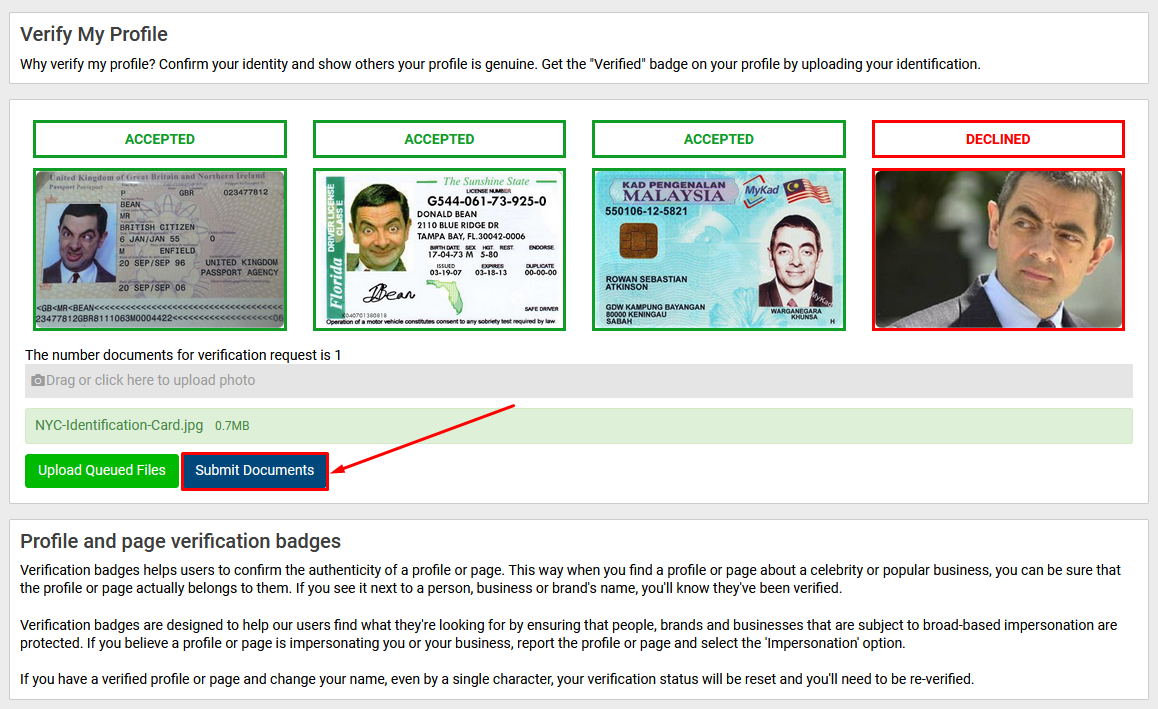
3. Enable Document Requirement: if this option is enabled, admin must fill the below fields (9) -> (16) . And uploading documents is mandatory field when site members send the profile verification request.

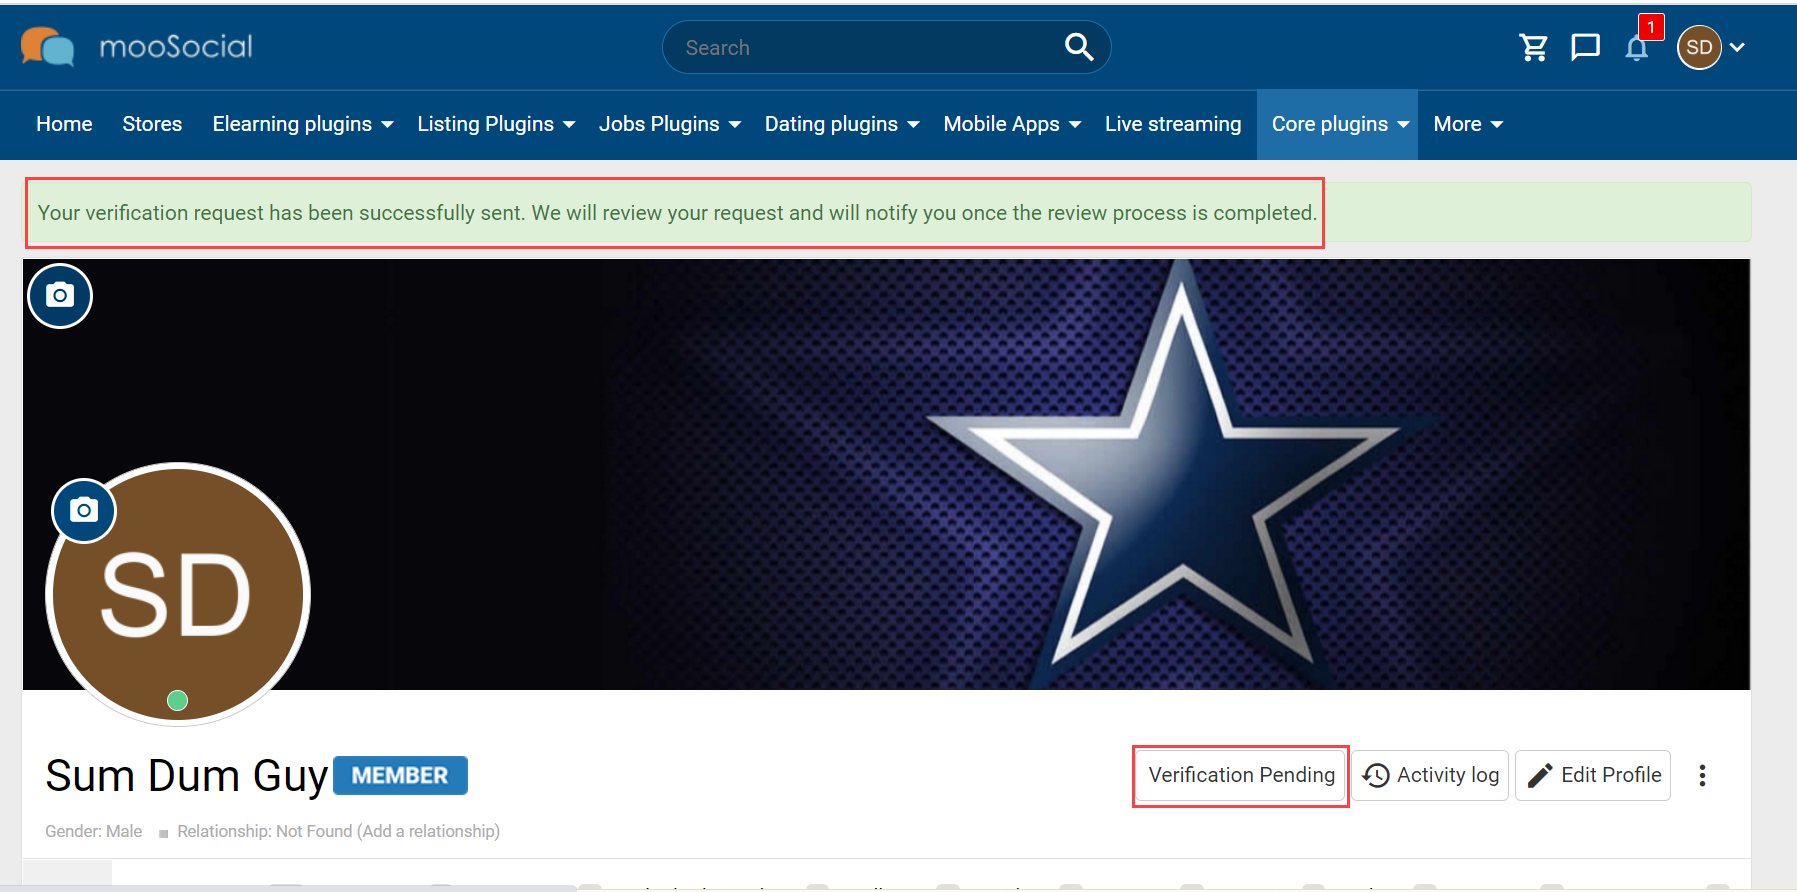
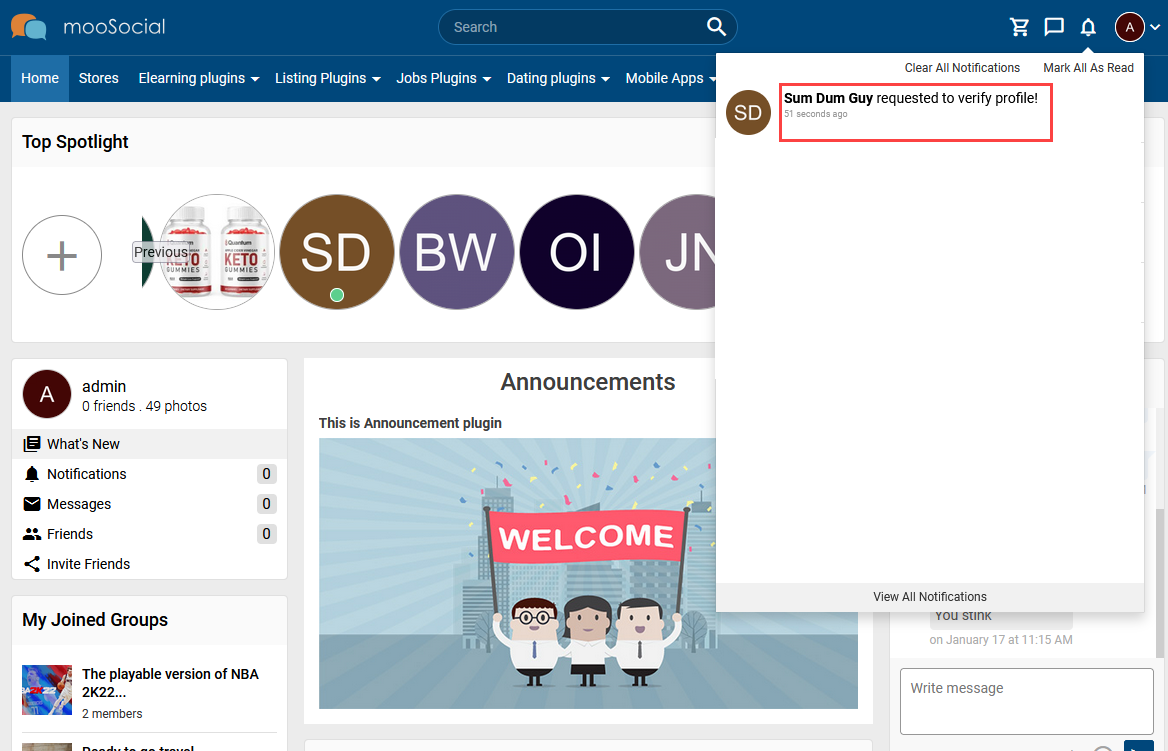
4. Information Needed Verification: Please tick on the fields which you want members need to verify. After their profiles are verified, site members must send the verification request again if they changes these information.

5.The Badge Shows at: The places where the verification badge will be shown.

6. Verify Badge: The verification badge image which you want to show on site.

7. Show Unverify Badge: if this option is enabled, the Unverify badge will be shown for members who have not verified yet.

8. Unverify Badge Image: The Unverify badge image which you want to show on site.


011_ProfileVerify


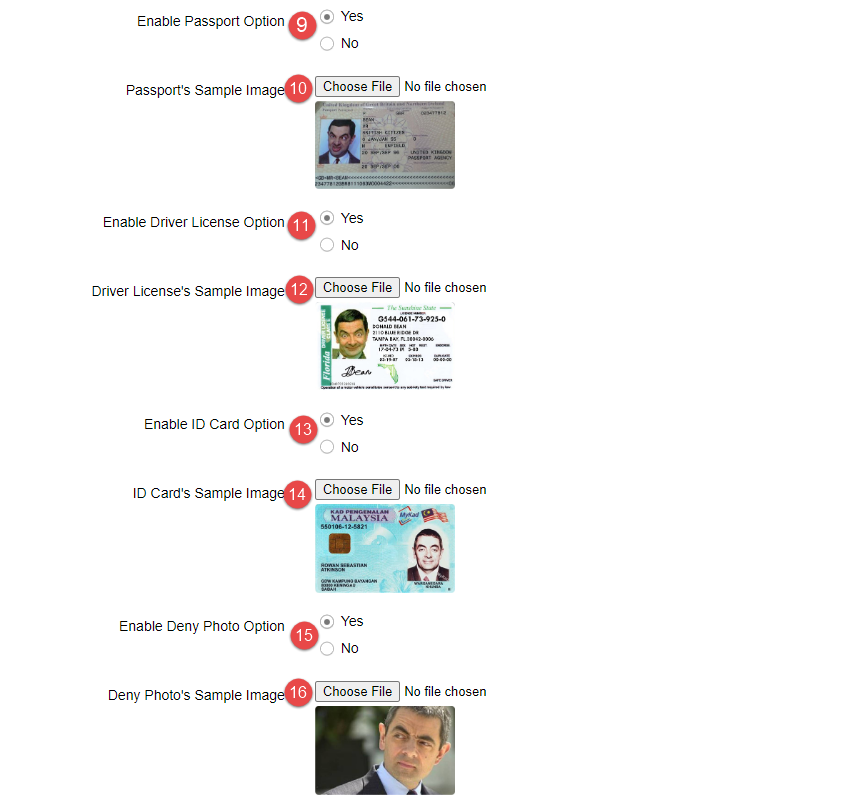
9. Enable Passport Option: if this option is enabled, Verify My Profile page will show the Passport field.

10. Passport’s Sample Image: upload the sample image which you are able to accept from the verification document of members.

11. Enable Driver License Option:  if this option is enabled, Verify My Profile page will show the Driver License field.

12.  Driver License’s Sample Image:  upload the sample image which you are able to accept from the verification document of members.

13. Enable ID Card Option: if this option is enabled, Verify My Profile page will show the ID Card field.

14. ID Card’s Sample Image: upload the sample image which you are able to accept from the verification document of members.

15. Enable Deny Photo Option: if this option is enabled, Verify My Profile page will show the Deny Photo field.

16. Deny Photo’s Sample Image: upload the sample image which you are NOT able to accept from the verification document of members.


012_ProfileVerify


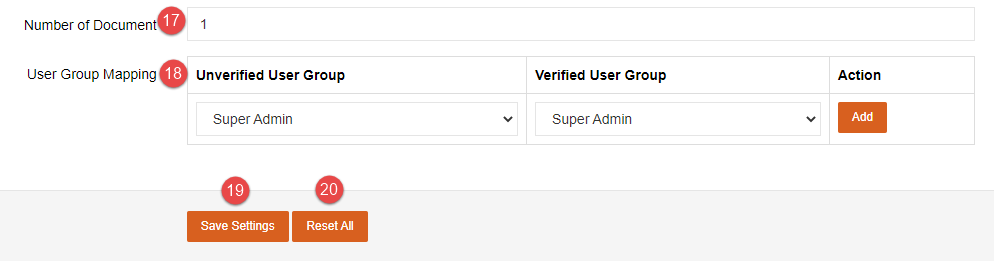
17. Number of Document: enter the number of documents user need to upload on the verification request.

18. User Group Mapping: User role can to be switched after members are verified or vice versa unverified

19. Save settings button: apply above settings on the Verify My Profile page.

20. Reset All button: return to the default setting of plugin.

How to use Profile Verify plugin?

The verification badge increases credibility. When users see a verification badge on a page or profile, it guarantees that they are interacting with a real person.

This tutorial will demonstrate to you how to use Profile Verify plugin.

Step 1. Go to My Profile page.

Step 2. Click the Verify My Profile button >> redirect to the Verify My Profile page.

018_ProfileVerify


Step 3. Upload the documents >> click the Upload Queued Files button.

019_ProfileVerify


Step 4. Click the Submit Documents button.

020_ProfileVerify


Will get the successful message and Verify button is changed after done uploading documents.

Snag_25e72a31


On the same time, site admin (user id == 1) will get a notification after user has sent the profile verification request successfully.

Snag_25e96e35