Archives

Dashboard for Seller

When you become a seller, you can go to your Seller Dashboard to view stats and insights.

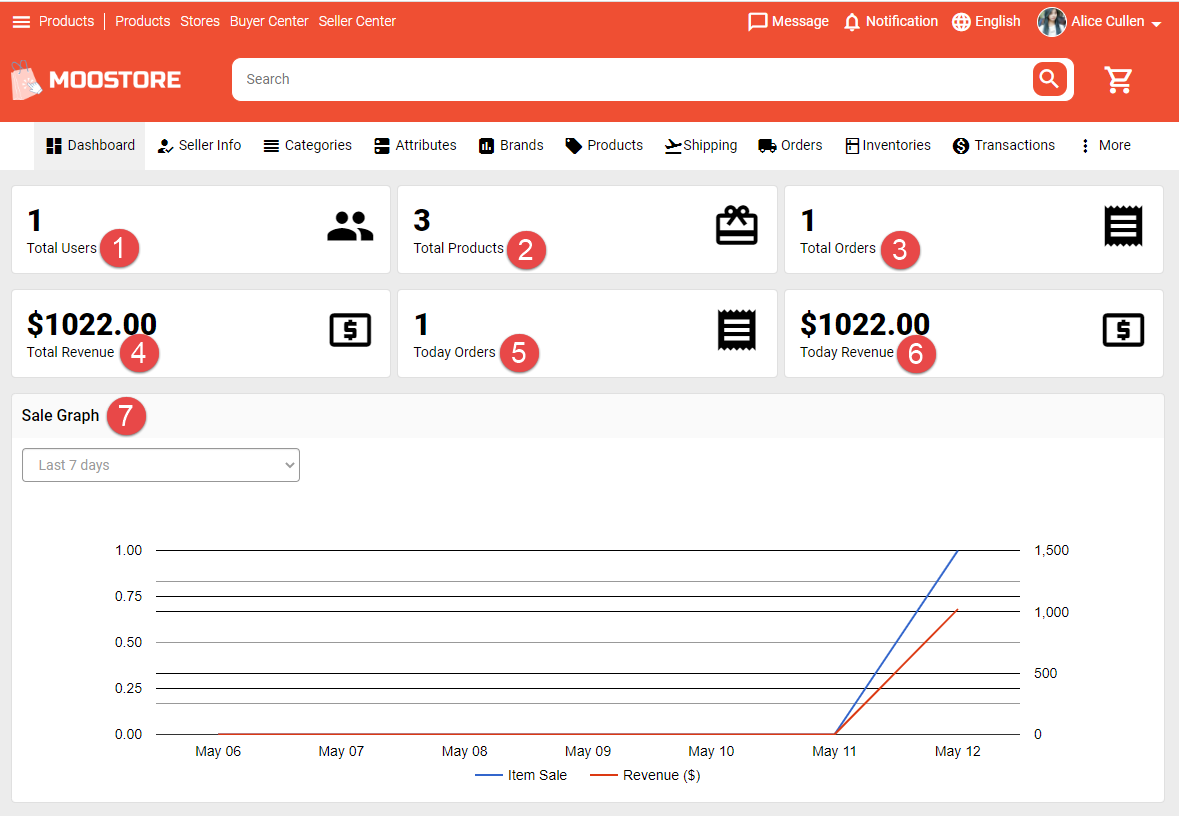
Dashboard page includes a bunch of graphs and data to show you total buyers, the number of orders that you received today and total orders, today revenue and total revenue, how many products that you sell, and much more.

This guide explains how to read and understand your store’s stats and insights.

001_Dashboard_seller

1. Total users: This section of stats counts the number of users buy product in your store.

2. Total products: This section of stats counts the number of products of your store.

3. Total orders: This section of stats shows the total orders that you receive.

4. Total revenue: This section of stats shows the total revenue.

5. Today orders: This section of stats shows  the number of orders that you receive today.

6. Today revenue: This section of stats shows your today revenue.

7. Sale graph: There are two main units of sale measurement are Item Sale and Revenue.

– An item sale is counted when an order is fulfilled successfully.

Revenue is calculated from completed orders.

In the graph, the horizontal axis depict a continuous progression by time, and the vertical axis reports value for a metric. When you click on the line, it will show the stats value.

You can filter to view graph by Last 7 days,  this month, last month, last 3 months, last 6 months and this year.


How to write a review on listing ?

Follow the steps below to know how to rate and review a listing.

Step 1: Go to the listing detail page for the item.

1

Step 2Click on Write review button in the Reviews section => show pop-up.

2Step 3:  Select a Star Rating + Add content and photos.

=> Click on Post button to submit a review.

You can see your review on the Reviews tab.

3

How to post a new listing by choosing a package ?

Classified plugin allows members to post listings by purchasing Classified Packages. Following the steps below to know how to post a new listing.

Go to Classified => Click on the Post New Listing field or Post New Listing button.

1

Choose the package for the listing.

2

Go to the Post a new listing page.

3

Fill in the blank fields:

      [1] Select category.

      [2] Enter the listing name.

      [3] Enter the listing details.

      [4] Enter the brand.

      [5] Describe the condition of the item.

      [6] Select payment method.

      [7] Enter the price.

      [8] Enter the number of available items.

      [9] Enter location.

      [10] Enter hashtags.

      [11] Upload the thumbnail.

      [12] Upload images.

      [13] Choose the privacy for the post. 

=> Click the Save button. The listing has been posted successfully.

4

How to create a classified posting package ?

This tutorial will show the process of creating a classified package.

Access Admin Dashboard => Plugins Manager => Classifieds 

At the Packages tab: Click the Add New Package button => show pop-up.

1

Fill in the blank fields:

  1.  Enter the package name.
  2.  Enter the description.
  3.  Enter the number of days.
  4.  Enter the number of days.
  5. Enter the price.
  6. Tick this box to make the listing featured.
  7. Tick this box to make the listing sponsored.
  8. Tick this box if you want the package to appear when you create a new classified. 
  9. Tick this box if you want the package to appear when upgrading the classified.

=> Click the Save button. The package has been saved successfully.

2

How to create a new poll ?

Poll plugin allows members of your social network to create polls and receive answers from other community members.

There are two ways to create a new poll: 

(1) What’s new box

When the Poll plugin has been installed on the site, members will see a Poll icon in the What’s New box on the Home page and Profile page.

1

Click on Poll icon => show pop-up

2

Fill in the blank fields:

       (1) Enter the poll title.

       (2) Enter the answers.

       (3) Select category.

       (4) Upload the thumbnail.

       (5) Choose the privacy for the post.

       (6) Enter hashtags.

       (7) Enter the number of days.

=> Click the Save button. The poll has been saved successfully.

3

(2) Go to Polls page

Click the Create New Poll button.

4

Go to Add New Poll page

5

Input data to all fields => Click the Save button. The poll has been added successfully.

6