How To Configure a Cron Job (cPanel)
Do you find yourself wasting hours on tedious and repetitive server administration tasks? If you answered yes, you’re going to love this article, which explores how cron and cPanel & WHM help you automate these boring but essential aspects of web hosting.
Cron is a time-based scheduler. It allows server administrators to run scripts known as cron jobs automatically at scheduled intervals. cPanel & WHM runs several essential server maintenance scripts in this way, and you or your users can schedule scripts too. You might, for example, configure a custom backup script to run at 7 a.m. each morning.
We’re going to look at some common uses of a cron, including how to schedule scripts, and how to add new jobs to automate server admin tasks.
Typical Uses of a Cron Job
Cron can run simple commands, shell scripts, and programs written in languages such as PHP, Python, and Perl. If a task can be completed on the command line or in a script, you can automate it with the task scheduler.
Cron job use-cases include:
- Log rotation — rotate old logs to an archive at pre-set intervals to stop them from growing to an unmanageable size.
- Emailing users — alert users when they’re approaching resource limits.
- Triggering updates — schedule checks for security updates and apply them automatically.
- Content management system and database backups — ensure you never forget to complete essential backups.
Configuring a Cron Job in cPanel
Cron uses a compact notation to represent times and days. A typical configuration line might look like this:
30 23 25 * * myscript.sh
The format has five white-space separated fields for time intervals followed by a command.
The schedule is stored in a “crontab” file, a list of jobs with additional directives. You can edit the file over SSH with the crontab command, but using cPanel & WHM is faster, easier, including two interfaces for scheduling jobs: one for cPanel’s maintenance scripts and one for user scripts, which we’ll take a look at in the next section.
Before we get to cPanel’s cron configuration interface, you should have a firm grasp of the interval notation.
The time fields represent the following, from left to right:
- Minutes — a number between 0 and 59.
- Hours — a number between 0 and 23. Cron uses the 24-hour format, so 4 p.m is 16, 11 p.m. is 23, and so on.
- Days of the month — a number between 1 and 31.
- Months — a number between 1 and 12.
- Days of the week — a number between 0 and 7, with Sunday represented as either 0 or 7.
Fields with an asterisk indicate that the job will run at every relevant interval compatible with the other fields.
Our first example specified the time interval “30 23 25 * *”. This is the 30th minute of the 23rd hour of the 25th day of the month. Or, to put it another way, 11:30 in the evening on the 25th of each month. Because the Month and Day of Week fields contain asterisks, the script runs on days and months for which the other fields are valid; in this case, every day and month.
Let’s look at some more complex examples. You have a monitoring script that you would like to run every hour, on the hour, between 9 a.m and 5 p.m., but only on weekdays. To achieve this, we have to introduce another piece of notation, the range.
00 9-17 * * 1-5 myscript.sh
Ranges are values separated by a hyphen. The example breaks down as:
- 00 — the first (or, more accurately, the zeroeth) minute of the hour.
- 9-17 — each hour between 9 a.m and 5 p.m.
- * — every day.
- * — every month.
- 1-5 — the first to the fifth day, so Monday to Friday.
What if, instead of every hour between 9 a.m. and 5 p.m, you wanted the script to run at 9 a.m, 12 p.m., 3 p.m., and 6 p.m on weekdays. For intervals of this type, you need one more piece of notation, the list.
00 9,12,15,18 * * 1-5 myscript
This example is the same as the previous one, but with a list in the Hours field instead of a range.
The basics we have outlined here should cover almost every situation, but cron has an incredibly flexible notation with additional shortcuts and directives. If you want to learn more, take a look at this article or the man page on your CentOS server with the command “man 5 crontab.”
Configuring cPanel Cron Jobs in WHM
cPanel & WHM schedules several scripts, including the upcp update script, backup, and cpbackup. Server administrators can adjust when these scripts run in WHM.
Select Configure cPanel Cron Jobs in Server Configuration in the sidebar menu.
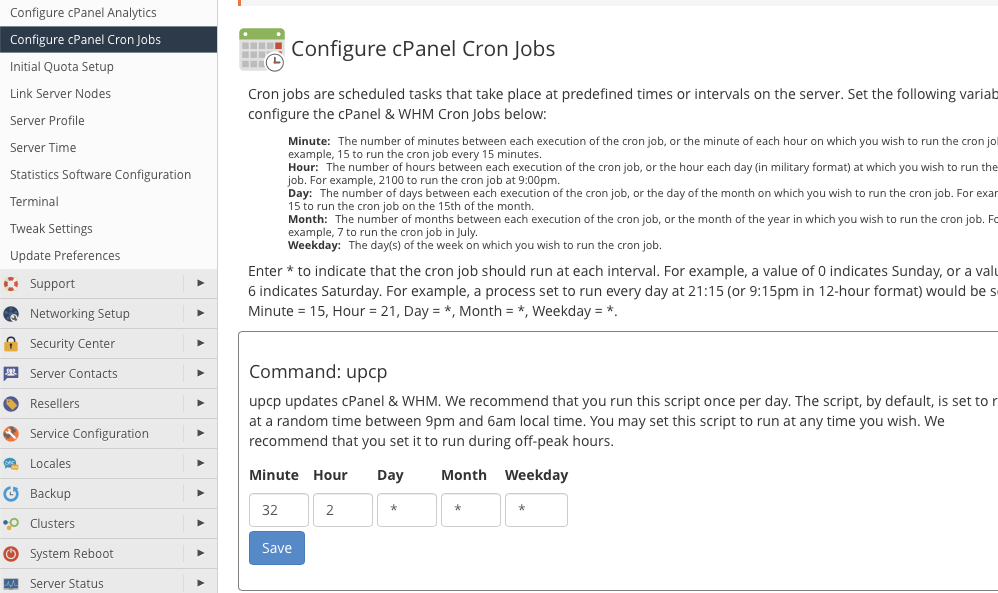
For each script, you will see five boxes to enter the notation we described above. We have selected sensible defaults, but you can change them to your preferred times.
Configuring Cron Jobs in cPanel
In cPanel, select Cron Jobs in the Advanced section of the Main Page menu.
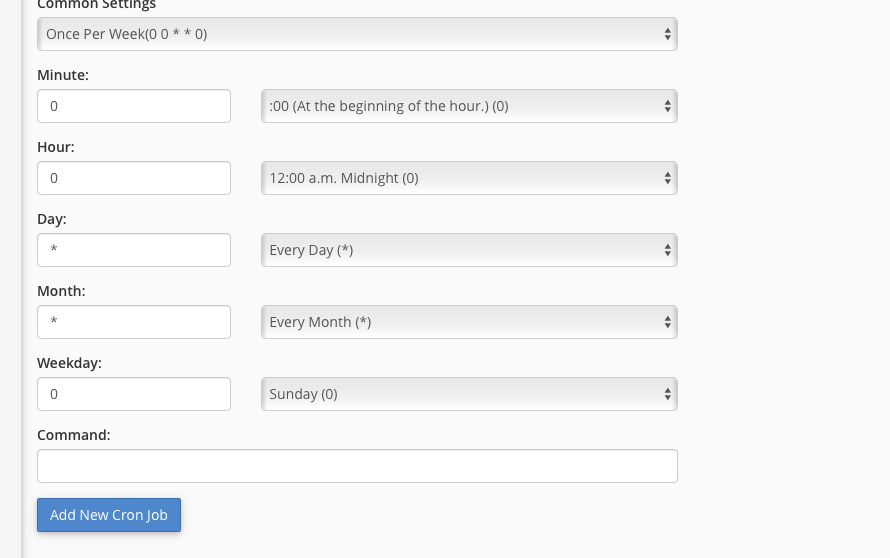
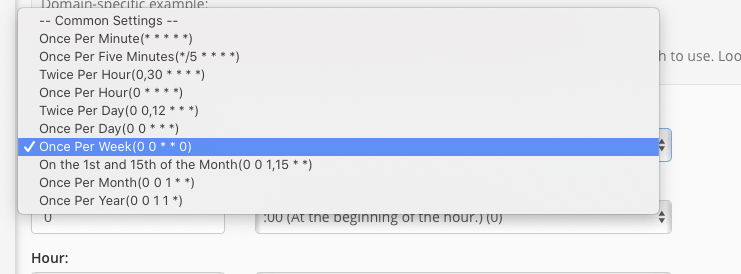
To simplify configuration, we include a drop-down menu with common settings such as Once Per Week or Once Per Month.
If you don’t find a setting that fits your needs in the main drop-down menu, enter a time interval in the boxes on the left or use the menus on the right to select from typical entries for each period.
Finally, enter the command or the path to your script in the Command field and hit the “Add New Cron Job” button to save. Cron will run the script automatically at the intervals you selected.
Cron is a simple but powerful tool for automating mundane, repetitive and easily forgotten server administration tasks. The interval format can be confusing at first, but a few minutes of study will save you many hours of work in the future, especially if you combine your knowledge with cPanel and WHM’s quick and easy configuration tools.