

-
Product Documentation
-
-
- Clear Global Caches
- Clean Temp Upload Folder
- Enabling Debug Mode
- Toggle Site for Maintenance
- How to configure (change color, font....) of current active theme
- How "Follow" feature work
- How to enable "Age limitation" for mooSocial site
- How to change "mooSocial branding" text at footer
- How to change site to Invite only mode
- How to Hide Site Content for Visitors - "Force login" setting
- How to by pass "force login" setting to show content of a specific plugin to visitors
- How does the "View feed from all members" in roles setting works
- How to modify sign up form and add more custom fields
- How to configure SMTP for email sending
- How to turn your community site to approved only mode
- How to activate Cookie Warning for your website
- Show Remaining Articles (1) Collapse Articles
-
- Setting up Cronjob
- Mailing Template & SMTP Mail Settings
- Creating and Editing Menus
- Enabling Follow Function
- Sitemaps and SEO Settings
- Remove powered by, mooSocial logo & favicon icon
- Access mooSocial Admin Dashboard
- Bulk Mail Settings
- How to setup mail Queue
- Auto Friend Function
- System settings
- Setup email of "contact us" form
- How to set default home page for logged in member
- How to configure (change color, font....) of current active theme
- How "Follow" feature work
- How to enable "Age limitation" for mooSocial site
- How to change "mooSocial branding" text at footer
- How to change site to Invite only mode
- How to Hide Site Content for Visitors - "Force login" setting
- How to by pass "force login" setting to show content of a specific plugin to visitors
- How does the "View feed from all members" in roles setting works
- How to modify sign up form and add more custom fields
- How to configure SMTP for email sending
- How to turn your community site to approved only mode
- How to remove mooSocial version and branding in Admin Panel
- How to activate Cookie Warning for your website
-
-
- Enable Subscribtions
- Creating Subscription Packages and Plans
- Setup Paypal Gateway
- Add google Adsense Widget Using Html Block
- How mooSocial subscription module works
- How to configure paypal express checkout payment gateway
- How mooSocial subscription module works
- How to add a new currency and set it as default currency for the system.
-
- How to configure mooApp
- How to enable Facebook and Google button for IOS app
- How To add new language into android app
- How to add push notification for app
- How to add/remove menu for android and IOS app
- Recommended coding environment for Android and IOS APP
- How to enable admob for mooSocial Android app
- How to enable admob mooApp on iOS"
- Fix push notification on mooSocial 3.1.4
- How to set up in apps purchase in Android (for client)
- How to set up in apps purchase in Android (for dev)
- How to configure (change color, font....) of current active theme
- How "Follow" feature work
- How to enable "Age limitation" for mooSocial site
- How to change "mooSocial branding" text at footer
- How to change site to Invite only mode
- How to Hide Site Content for Visitors - "Force login" setting
- How to by pass "force login" setting to show content of a specific plugin to visitors
- How does the "View feed from all members" in roles setting works
- How to modify sign up form and add more custom fields
- How to configure SMTP for email sending
- How to turn your community site to approved only mode
- How to activate Cookie Warning for your website
-
Plugins Documentation
-
- Get Direction to a Business
- How to Claim a Business
- Creating Package for Business
- Create & Manage Business Categories (Admin)
- How to verify a business?
- How to create a Sub-page?
- How to upgrade a Business?
- How-to feature my business
- How-to add business admin and configure permission to admins
- How the subscription feature of the business directory works
-
- How to set a daily livestream time limit for a specific user role?
- How to Purchase a Livestream Package and Start Streaming with Live Video plugin?
- How to create a Livestream Package (in-app Purchase) on Android?
- How to create a Livestream Package (In-App Purchase) on iOS?
- How to set the Livestream fee?
- How to create a Livestream Package on Web?
- How to enable Live Video plugin?
-
- How to save the search ?
- How to enable a pop-up asking members to update their location ?
- How to Find Nearby People ?
- How to enable the Age and Gender display ?
- How to use the Mapping Locations feature ?
- How to configure settings (Themes type, Default distance, Max distance, Default map position) for Who near me plugin ?
-
- Articles coming soon
-
- Articles coming soon
-
- Articles coming soon
-
- Articles coming soon
-
- Articles coming soon
-
- Articles coming soon
-
- Articles coming soon
-
- How to generate Agora App ID & Primary Certificate?
- How to enable Message plugin and limit sending messages?
- How to allow sending attachments in messages?
- How to enable and set pricing for Audio & Video call?
- How to Calculate Call Service Costs?
- How to generate keys and setup Pusher for real-time chat?
-
FAQ
- How to change default cover for desktop site and mobile app
- How to move your mooSocial site to another server
- How to translate / change closing network singup phrase on landing page
- mooSocial Self-Hosted - Step-by-Step Guide
- How to restart chat add-on if it is not working on your site?
- Remove Recent Joined Users from Close Network Landing Page
- How to config STUN and TURN servers for Video/audio chat plugin
- Build a scalable, load balancing for moosocial on DigitalOcean
- How to change content of "about us", "Policies" and "Terms of services"
- How to purchase new plugins and themes from mooSocial
- Setup email of "contact us" form
- How to change site to RTL
- How to add "Location" field into member profile
- Where the email will go if someone submit contact us form
- How to add a new currency and set it as default currency for the system.
- How to set default home page for logged in member
- How to change the "-" in profile address into other character
- How to remove mooSocial version and branding in Admin Panel
- Show Remaining Articles (3) Collapse Articles
-
mooSocial Cloud
- mooSocial Cloud - Step-by-Step Guide
- How to map mooCloud social network to your own domain name
- Upgrade your existing mooSocial cloud plan to new plan
- Cancel your existing mooSocial cloud plan
- How to start my own social network site with mooSocial cloud
- Install new language and translate your site to new language
-
mooStore
-
mooDating script
-
- How to restrict to ask member to upload profile picture?
- How to enable/disable the profile matching questions step at sign up process?
- Enable/disable location field
- How to allow member to add more interest item into system.
- Manage genders
- How does the home feed work?
- How does "find a match" and "encouters" works?
- How does the "Popularity" section work?
-
mooWP - social networking plugin for WordPress
How To Configure a Cron Job (cPanel)
Do you find yourself wasting hours on tedious and repetitive server administration tasks? If you answered yes, you’re going to love this article, which explores how cron and cPanel & WHM help you automate these boring but essential aspects of web hosting.
Cron is a time-based scheduler. It allows server administrators to run scripts known as cron jobs automatically at scheduled intervals. cPanel & WHM runs several essential server maintenance scripts in this way, and you or your users can schedule scripts too. You might, for example, configure a custom backup script to run at 7 a.m. each morning.
We’re going to look at some common uses of a cron, including how to schedule scripts, and how to add new jobs to automate server admin tasks.
Typical Uses of a Cron Job
Cron can run simple commands, shell scripts, and programs written in languages such as PHP, Python, and Perl. If a task can be completed on the command line or in a script, you can automate it with the task scheduler.
Cron job use-cases include:
- Log rotation — rotate old logs to an archive at pre-set intervals to stop them from growing to an unmanageable size.
- Emailing users — alert users when they’re approaching resource limits.
- Triggering updates — schedule checks for security updates and apply them automatically.
- Content management system and database backups — ensure you never forget to complete essential backups.
Configuring a Cron Job in cPanel
Cron uses a compact notation to represent times and days. A typical configuration line might look like this:
30 23 25 * * myscript.sh
The format has five white-space separated fields for time intervals followed by a command.
The schedule is stored in a “crontab” file, a list of jobs with additional directives. You can edit the file over SSH with the crontab command, but using cPanel & WHM is faster, easier, including two interfaces for scheduling jobs: one for cPanel’s maintenance scripts and one for user scripts, which we’ll take a look at in the next section.
Before we get to cPanel’s cron configuration interface, you should have a firm grasp of the interval notation.
The time fields represent the following, from left to right:
- Minutes — a number between 0 and 59.
- Hours — a number between 0 and 23. Cron uses the 24-hour format, so 4 p.m is 16, 11 p.m. is 23, and so on.
- Days of the month — a number between 1 and 31.
- Months — a number between 1 and 12.
- Days of the week — a number between 0 and 7, with Sunday represented as either 0 or 7.
Fields with an asterisk indicate that the job will run at every relevant interval compatible with the other fields.
Our first example specified the time interval “30 23 25 * *”. This is the 30th minute of the 23rd hour of the 25th day of the month. Or, to put it another way, 11:30 in the evening on the 25th of each month. Because the Month and Day of Week fields contain asterisks, the script runs on days and months for which the other fields are valid; in this case, every day and month.
Let’s look at some more complex examples. You have a monitoring script that you would like to run every hour, on the hour, between 9 a.m and 5 p.m., but only on weekdays. To achieve this, we have to introduce another piece of notation, the range.
00 9-17 * * 1-5 myscript.sh
Ranges are values separated by a hyphen. The example breaks down as:
- 00 — the first (or, more accurately, the zeroeth) minute of the hour.
- 9-17 — each hour between 9 a.m and 5 p.m.
- * — every day.
- * — every month.
- 1-5 — the first to the fifth day, so Monday to Friday.
What if, instead of every hour between 9 a.m. and 5 p.m, you wanted the script to run at 9 a.m, 12 p.m., 3 p.m., and 6 p.m on weekdays. For intervals of this type, you need one more piece of notation, the list.
00 9,12,15,18 * * 1-5 myscript
This example is the same as the previous one, but with a list in the Hours field instead of a range.
The basics we have outlined here should cover almost every situation, but cron has an incredibly flexible notation with additional shortcuts and directives. If you want to learn more, take a look at this article or the man page on your CentOS server with the command “man 5 crontab.”
Configuring cPanel Cron Jobs in WHM
cPanel & WHM schedules several scripts, including the upcp update script, backup, and cpbackup. Server administrators can adjust when these scripts run in WHM.
Select Configure cPanel Cron Jobs in Server Configuration in the sidebar menu.
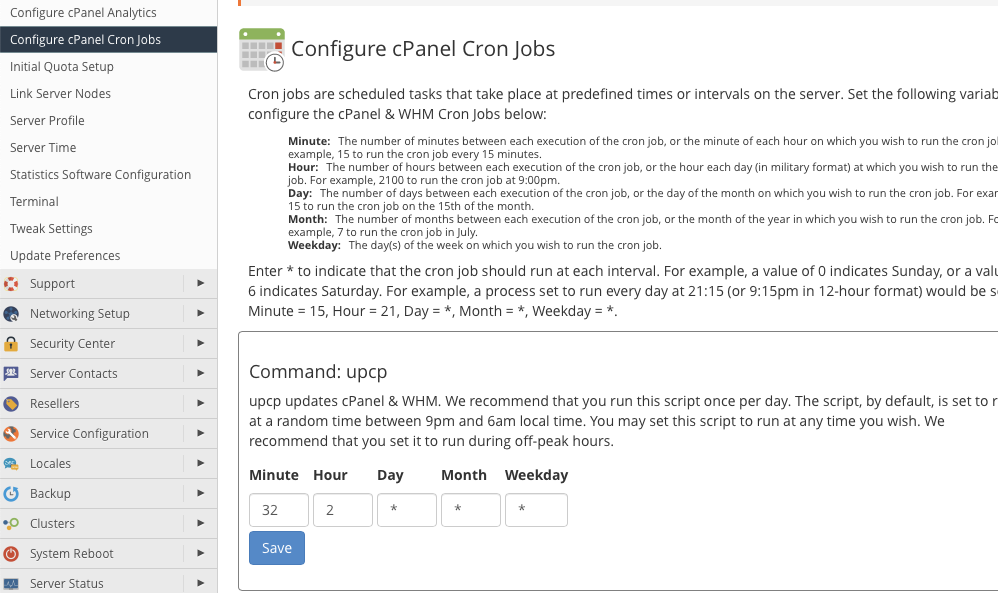
For each script, you will see five boxes to enter the notation we described above. We have selected sensible defaults, but you can change them to your preferred times.
Configuring Cron Jobs in cPanel
In cPanel, select Cron Jobs in the Advanced section of the Main Page menu.
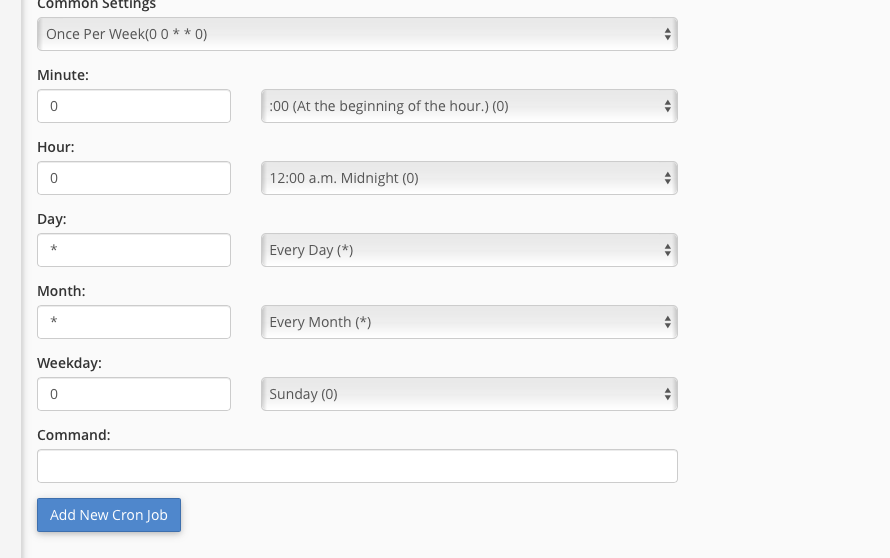
To simplify configuration, we include a drop-down menu with common settings such as Once Per Week or Once Per Month.
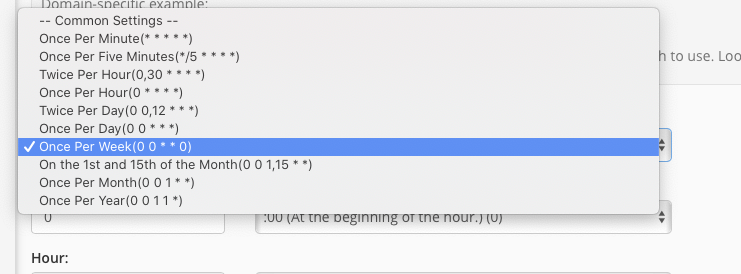
If you don’t find a setting that fits your needs in the main drop-down menu, enter a time interval in the boxes on the left or use the menus on the right to select from typical entries for each period.
Finally, enter the command or the path to your script in the Command field and hit the “Add New Cron Job” button to save. Cron will run the script automatically at the intervals you selected.
Cron is a simple but powerful tool for automating mundane, repetitive and easily forgotten server administration tasks. The interval format can be confusing at first, but a few minutes of study will save you many hours of work in the future, especially if you combine your knowledge with cPanel and WHM’s quick and easy configuration tools.