Archives

mooSocial Cloud – Step-by-Step Guide

After your site is active, please follow Step-by-Step Guide here to setup your community to make it works and looks follow your needs

  1. How to start my own social network site using mooSocial cloud
  2. How to login to admin panel of your website
  3. Why and how to to clear global cache when make changes in admin dashboard. 
  4. Do general settings like Change site name, site description, site keyword, set default timezone, default language….
  5. Set up SMTP to send notification & invite friends email
  6. Add Google Developer Key Or Enable OpenStreetMap
  7. Change Powered by info at footer, mooSocial Logo and favicon icon
  8. Change max upload file size
  9. Enable Spam Protection with reCaptcha 
  10. Setup Facebook & Google Login button
  11. Change content of about us, site policies, terms of services.
  12. Add new page into your site
  13. Install new language if you want to have more than 1 language.
  14. Domain mapping
  15. Upgrade your existing mooSocial cloud plan to new plan
  16. Setup email of “contact us” form
  17. Purchase and install new plugins + themes
  18. Manage menu
  19. Layout Manager
  20. Add Adsense Ads Widget
  21. Change color of the theme
  22. Create your own custom landing page, error page…. using magic page plugin.

Configure these plugins if you buy those

For more documents, please check our help center here

Install mooSocial

In most cases, installing mooSocial is a very simple process which takes only a few minutes to complete. Before starting installation, there are a few things you need to know and do before the installation process.

Know

  • Access to your web server (via shell, cPanel, DirectAdmin, Plesk or FTP)
  • Access to your MySQL server (via shell or phpMyAdmin)
  • An FTP client such as FileZilla
  • Your Web browser of choice

Do

By default, mooSocial is shipped with mod_rewrite enabled. If you are not installing mooSocial on apache server or your server does not have mod_rewrite, please read the last section of this guide. Or if your server is not running apache and you still want to use mod_rewrite, check out “Installing mooSocial without mod_rewrite” section.

  • Check to ensure that your server meet the follow requirements: PHP 8+,  MySQL 5+,  PHP extensions:mbstring php, PHP XML Extension,  MySql PDO, GD2, Curl, libxml, exif, zlib (if you need to export theme), Magic quotes must be disabled, Memory Limit: 128M+, suhosin.session.encrypt should be turned off, mod_rewrite should be enable. Should “Turn off” mod_deflate or the zlib.output_compression on PHP.
  • Download the latest release available of mooSocial
  • Unzip the downloaded file on your hard drive
  • Make sure the following directories are writable by the web server user: app/Config, app/tmp and all its subdirectories, app/webroot/uploads and all its subdirectories
  • Create a database for mooSocial on your web server, as well as a MySQL user who has all privileges for accessing and modifying it.

Video

(Coming Soon)

File Upload

Upload files and folders within mooSocial Directory to the desired location on your web server

  • If you want to install mooSocial into the root of your domain (e.g. http://example.com/), move or upload all contents of the unzipped mooSocial directory (excluding the mooSocial directory itself) into the root directory of your web server.
  • If you want to have your mooSocial installation in its own subdirectory on your website (e.g. http://example.com/moosocial/), create the moosocial directory on your server and upload the contents of the unzipped mooSocial package to the directory via FTP.

Note: If your FTP client has an option to convert file names to lower case, make sure it’s disabled.

Installation Wizard

Run the mooSocial installation wizard by accessing the URL in the web browser. This should be the URL where you uploaded the mooSocial files (Ex.http://example.comhttp://example.com/moosocial)

Step 1: Check Requirements

Click Next to continue

moosocial.com_wiki_lib_plugins_ckgedit_fckeditor_userfiles_image_how_to_install_step1.jpg

Step 2: Setup MySQL Database

Enter your database information and click Next. Unix Socket and Table Prefix are optional, leave them empty if you are not sure.
moosocial.com_wiki_lib_plugins_ckgedit_fckeditor_userfiles_image_how_to_install_step2a.jpg

Step 3: Site Setting

Enter your site name (Ex. mooSocial Demo). Site email is the email address your site will use to send out email notifications. Once chosen, default time zone will be preselected for all new signups.

moosocial.com_wiki_lib_plugins_ckgedit_fckeditor_userfiles_image_how_to_installstep3.jpg

Step 4: Root Admin Account

Enter information for Admin account and press Next. 
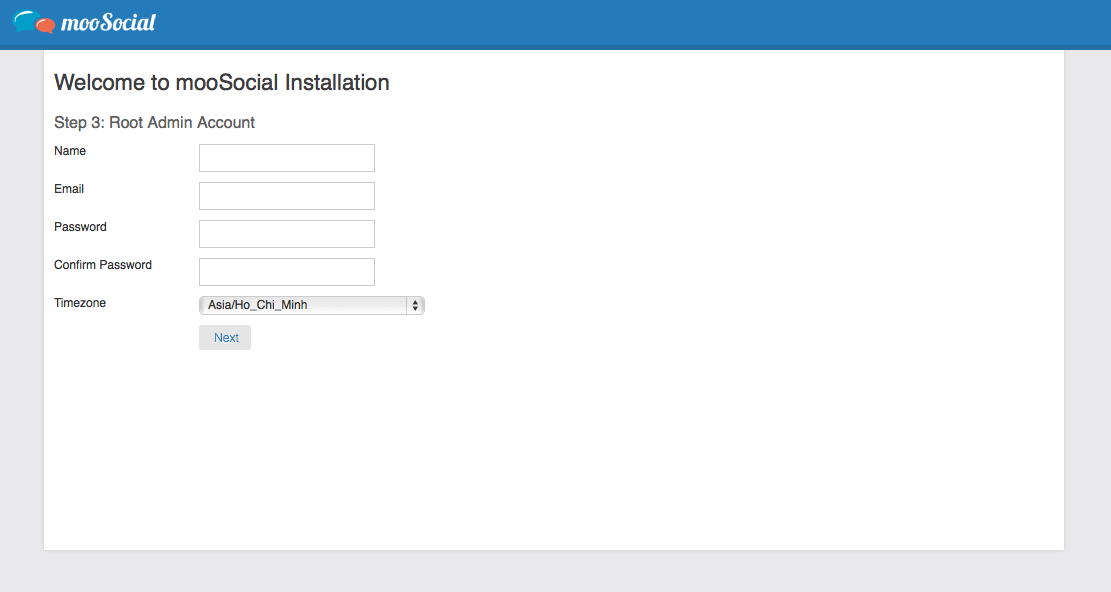
DONE!

Congratulations! You have successfully installed mooSocial. You are now ready to build your social network with mooSocial.

After finishing installing the software, you can log in to your admin account and visit the admin panel to configure the site settings

Below is a list of settings that you need to do after installing:

1. Integrate youtube API so that your member can share a video from youtube to your site

https://moosocial.com/wiki/doku.php?id=how_to:integrate_youtube_api integrate_youtube_api

2. Add your own logo:

https://moosocial.com/wiki/doku.php?id=how_to:add_a_custom_logo
https://moosocial.com/wiki/doku.php?id=how_to:remove_default_logo

3. Change general/system settings follow your choice:

https://moosocial.com/wiki/doku.php?id=admin_dashboard:system_admin:system_settings:general_settings
https://moosocial.com/wiki/doku.php?id=admin_dashboard:system_admin:system_settings:features_settings

4. Enable reCaptcha to prevent spammers:

https://moosocial.com/wiki/doku.php?id=admin_dashboard:system_admin:recaptcha_integration

5. Social Integration configuration so that your members can sign up to your site using their fb/google plus account

https://moosocial.com/wiki/doku.php?id=admin_dashboard:system_admin:system_settings:integration_settings

Installation Service

We offer Installation Service for customers who do not want to be bothered or feel comfortable performing the installation. It could be purchased in the Client Area of our website after the initial purchase of mooSocial license. Submit a support request with your site information once Installation Service has been ordered for us to initiate the installation process. Please allow up to 24 to 48 hours after submitting the support request for us to perform the installation.

NOTE

By default, mooSocial is shipped with mod_rewrite enabled. If you are not installing mooSocial on apache server or your server does not have mod_rewrite, please read the section below. Or if your server is not running apache and you still want to use mod_rewrite, check out “Installing mooSocial without mod_rewrite” section.

Installing mooSocial without mod_rewrite

For some hosting services (e.g. GoDaddy, 1and1…), you might need to add RewriteBase statements to the .htaccess files mooSocial uses (/.htaccess, /app/.htaccess, /app/webroot/.htaccess).

RewriteEngine On RewriteBase /

If you don’t want or can’t get mod_rewrite (or some other compatible module) up and running on your server, you’ll need to use the built in pretty URLs. In /app/Config/core.php, uncomment the line that looks this

Configure::write(‘App.baseUrl’, env(‘SCRIPT_NAME’));

Also remove these .htaccess files:

/.htaccess /app/.htaccess /app/webroot/.htaccess This will make your URLs look like www.example.com/index.php/controllername/actionname/param rather than www.example.com/controllername/actionname/param/

mooSocial Self-Hosted – Step-by-Step Guide

Please follow the below main step to configure your mooSocial after finish installing mooSocial

  1. How to login to admin panel to configure site
  2. Why and how to to clear cache when make changes in admin dashboard. 
  3. Do general settings like Change site name, site description, site keyword, set default timezone, default language….
  4. Set up SMTP to send notification & invite friends email
  5. Add Google Developer Key Or Enable OpenStreetMap
  6. Change Powered by info at footer, mooSocial Logo and favicon icon
  7. Change max upload file size
  8. Enable Spam Protection with reCaptcha 
  9. Setup Facebook & Google Login button
  10. Secure your site by enable SSL
  11. Change content of about us, site policies, terms of services.
  12. Add new page into your site
  13. Install new language if you want to have more than 1 language. You also purchase “Translation tool” plugin so that you can change all texts OR translate text to another languages using this plugin.
  14. Setup email of “contact us” form
  15. Purchase and install new plugins + themes
  16. Setup Cron
  17. Manage menu
  18. Layout Manager
  19. Add Adsense Ads Widget
  20. Change color of the theme
  21. Create your own custom landing page using magic page plugin. Need to buy magic page plugin here

Configure these plugins if you buy those

Frequently Ask Question